Using Logback With Spring MVC

January 7th, 2014 No comments

Logback is yet another logging framework intended to be successor of the widely used Log4J. I came across Logback several years ago but it never paid a whole lot of attention to it. Now I am convinced that Logback and SLF4J is the way logging should be done in applications.

So, what’s so great about Logback. The Logback site lists several reasons why Logback is superior. Here are my three favorite reasons:

  • Logback is faster than Log4J – Logging is a cross cutting concern and ideally shouldn’t have any impact on the application’s performance. But with the number of log statements that enterprise applications contain these days, this is not true. So the faster the logging framework, the better in my opinion.
  • Stack traces contain packaging data – Here is an example stack trace logged using Logback:

    java.lang.RuntimeException: null
    at com.inflinx.spring4.web.controller.HomeController.home(HomeController.java:15) ~[HomeController.class:na]
    at sun.reflect.NativeMethodAccessorImpl.invoke0(Native Method) ~[na:1.7.0_45]
    at sun.reflect.NativeMethodAccessorImpl.invoke(NativeMethodAccessorImpl.java:57) ~[na:1.7.0_45]
    at sun.reflect.DelegatingMethodAccessorImpl.invoke(DelegatingMethodAccessorImpl.java:43) ~[na:1.7.0_45]
    at java.lang.reflect.Method.invoke(Method.java:606) ~[na:1.7.0_45]
    at org.springframework.web.method.support.InvocableHandlerMethod.invoke(InvocableHandlerMethod.java:214) ~[spring-web-4.0.0.RELEASE.jar:4.0.0.RELEASE]
    at org.springframework.web.method.support.InvocableHandlerMethod.invokeForRequest(InvocableHandlerMethod.java:132) ~[spring-web-4.0.0.RELEASE.jar:4.0.0.RELEASE]

    Notice the packaging information at the end of each line inside [] brackets. It definitely simplifies troubleshooting issues.

  • Condensed package names – It is possible to instruct Logback to generate condensed package names in the logs. With this feature turned on, you will see o.s.w.servlet.DispatcherServlet in the logs instead of org.springframework.web.servlet.DispatcherServlet.

    If you like this feature and want to use it in Log4J, check out EnhancedPatternLayout

Though, you can directly use Logback in your application, it usually make sense to use a logging facade like SLF4J.

Now that I have convinced you that Logback is a better option, let’s see what it takes to use it. If we are using Maven, using Logback simply involves declaring the following dependencies:

The next step is to create logback.xml file under src/main/resources and logback-test.xml file under src/test/resources. Logback first looks for logback-test.xml file in classpath. If it doesn’t find it, it tries to look for logback.xml file. This makes it easy to have different configurations for test and production.

The logback.xml file is similar to log4j.xml file that many of us are familiar with. Here is a sample logback.xml file that you can use:

It is possible for Logback to automatically scan for configuration modifications and reload its configuration. The scan and scanPeriod attributes can be used to set the reload information. This is done using scan and scanPeriod attributes in the configuration element. The layout pattern used above will produce logs like this:

12:53:34.374 [localhost-startStop-1] DEBUG o.s.c.e.PropertySourcesPropertyResolver – Searching for key ‘spring.liveBeansView.mbeanDomain’ in [systemProperties]

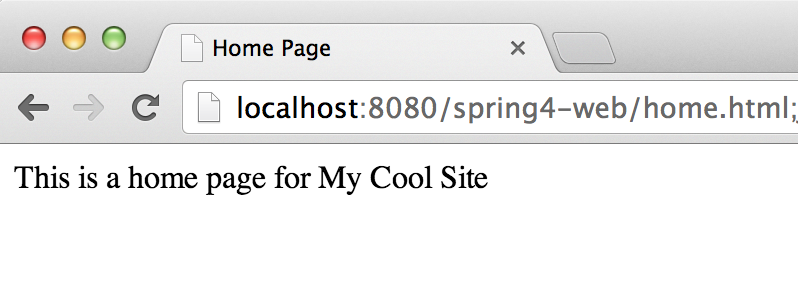
Now we are all set to use Logback. Here is an example from the Spring 4 starter web project that demo’s Logback usage:
Categories: Logback Tags: ,

Spring 4 Web Starter Project

January 6th, 2014 No comments

In this blog post, I will share a Spring 4 based starter project that can be used to jump start Spring based web development. The complete project is available on GitHub at: spring4-web

This starter project has the following features:

  • Completely updated to use Spring 4.0 and Servlet 3.0. You will need containers such as Tomcat 7 to use this project.
  • Fully working pom.xml file with all the required dependencies
  • Working configuration with a sample controller
  • A “catch all” global exception handler using @ControllerAdvice
  • Support for message resources
  • A sample Spring configuration file for middle tier (service/repository layers)
  • SLF4J and Logback for logging
  • Spring BOM file included in the pom so that correct versions of Spring projects are bundled

If you have generated Spring Web projects using my archetype, you will notice that this starter project is not vastly different. Here are few changes/best practices I am following this time:

  1. The config files no longer contain XSD version. So instead of using http://www.springframework.org/schema/beans http://www.springframework.org/schema/beans/spring-beans-3.2.0.xsd in the configuration files, I will be using http://www.springframework.org/schema/beans http://www.springframework.org/schema/beans/spring-beans.xsd
  2. All the JSP pages are now moved to WEB-INF/views folder. Using Spring’s , I have eleminated the need to have a starter .jsp or html page under the project root.
  3. All the Spring configuration files are now located under src/main/resources/spring folder.

If you get the project running successfully, you should see a page similar to this:
Spring 4 Web Starter Project - 1

If there is an error in the application, you will see the exception page with a correlation id. I am using Apache Commons Lang’s RandomStringUtils to generate correlation ids.
Spring 4 Web Starter Project - 2

I will be using this starter project in my future blogs to demo some of Spring 4’s new features. Give this a try and let me know what you think.

Categories: Solutions Log, Spring Tags: ,

Getting Started With Git and GitHub on Mac

January 5th, 2014 No comments

I recently got a new Mac and had to go through the process of connecting to GitHub. Here is some notes that I took during this process.

We start our journey at GitHub.com. If you are new to GitHub, you would need to create an account before proceeding. Once you are logged in to GitHub, hit the “Create a New Repo” button on the top right.

1

Enter your new repo information as shown below. I have asked GitHub to create a README file and added MIT License. If you are not sure what license to use, GitHub provides a website to help you with your decision. GitHub also allows you to add a .gitignore file with predefined ignore patterns while creating a repo.

2

Once GitHub creates a repo, you will be redirected to the repo page and you can see the contents of the repo.
3

This concludes our setup on GitHub. The next step is to checkout the repo on to your Mac. Before we do that, check and make sure you have Git instlled on your Mac:
4

Since I have already installed XCode for iOS App development, Git gets installed during that process. If you don’t have Git installed, you can download it from GitHub site.

The next step is to configure Git. Open a Terminal and run the following commands:

 $git config --global user.name "Your Name"
 $git config --global user.email "Your Email Address"
 $git config --global apply.whitespace nowarn

Since we are running on Mac, let’s make sure that .DS_Store folders are ignored globally. To do this, run the following command:

  git config --global.core.excludesfile ~/.global_gitignore
  echo .DS_Store >> ~/.global_gitignore

In the past, I have used SSH Keys to connect Mac to GitHub. Moving forward, I will be using Https instead. One drawback with Https is that it would require us to enter our username and password everytime we talk to GitHub. To fix this, we will use osxkeychain credential helper to cache our username and password. Before you move forward run the following command to ensure that osxkeychain is installed.

git credential-osxkeychain
usage: git credential-osxkeychain 

Now, configure Git to use osxkeychain credential helper:

   $git config --global credentail.helper osxkeychain

We are finally ready to checkout the GitHub repo. Run the following command:

  git clone https://github.com/YOUR_USERNAME/YOUR_REPO_NAME 

If you have everything setup correctly, Git would create a folder with your repo name and checkout files. You should see a result similar to this:
5

Go to the repo and run git status. You should get message “nothing to commit, working directory clean”.

Let’s modify READEME.md file using your favourate editor. Now running git status shows that we have modified READEME.md.
6

Let’s commit README file by running the following command:

  git commit -am "Updated README"

The final step in this process is to push our changes over to GitHub by running the following command:

  git push origin master

If you are running this for the first time, you will be prompted to enter username and password. Git will cache these and will not prompt you in future. Since, I have this information cached, here is what I get:
7

Go to GitHub.com repo and see that your changes are on the repo:
8

Categories: Git, Solutions Log Tags: , ,

Maven – Bill Of Materials

December 29th, 2013 1 comment

As I have been playing with Spring Boot (more on that in the coming blogs), I came across Maven’s Bill of Materials or BOM. Before I get into the details of BOM, let’s look at a common problem with lot of Spring projects. Here is a pom.xml snippet from a Spring Web Project that uses Spring Data JPA:

   <dependency>
      <groupId>org.springframework.data</groupId>
      <artifactId>spring-data-jpa</artifactId>
      <version>1.0.3.RELEASE</version>
   </dependency>
<dependency>
 <groupId>org.springframework</groupId>
 <artifactId>spring-context</artifactId>
    <version>${org.springframework-version}</version>
    <exclusions>
        <!-- Use SLF4J. Not commons logging -->
        <exclusion>
            <groupId>commons-logging</groupId>
            <artifactId>commons-logging</artifactId>
         </exclusion>
    </exclusions>
</dependency>

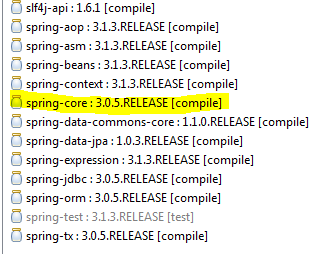
If you observe, the above configuration would pull different versions of Spring dependencies:

Blog 1

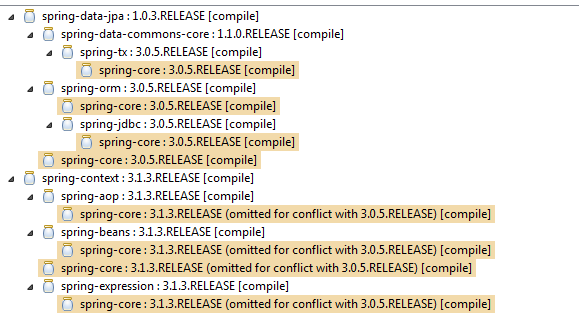
As you can see from the Dependency Hierarchy picture below, Spring Data JPA is pulling an older version of Spring Core.
Maven BOM

This intermixing of different versions of Spring (or any other library as a matter of fact), is not desirable and can cause unexpected issues. Of Course, this can be fixed by explicitly adding spring-core dependency.

This is where Maven’s “bill of materials” or BOM comes into picture. A BOM is simply a pom.xml file that contains a list of dependencies and their corresponding versions declared under dependencyManagement section. The set of artifacts defined in a BOM make up a “library” or a “stack”. Including a library’s predefined BOM in a project ensures that any library dependency imported into the project (direct or transitive) will be at the correct blessed version.

Now let’s see how the new Spring Framework’s BOM helps alleviate the above problem. We start by adding the following snippet to pom.xml file. Notice that we are using version 4.0.0.RC2.

<dependencyManagement>
    <dependencies>
        <dependency>
            <groupId>org.springframework</groupId>
            <artifactId>spring-framework-bom</artifactId>
            <version>4.0.0.RC2</version>
            <type>pom</type>
            <scope>import</scope>
        </dependency>
    </dependencies>
</dependencyManagement>

The next step is to remove the version information for spring-context dependency:

<dependency>
   <groupId>org.springframework</groupId>
   <artifactId>spring-context</artifactId>
   <exclusions>
      <!-- Use SLF4J. Not commons logging -->
      <exclusion>
         <groupId>commons-logging</groupId>
         <artifactId>commons-logging</artifactId>
      </exclusion>
   </exclusions>
</dependency>

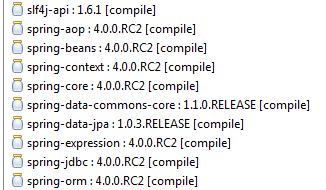
This configuration will result in the right versions of all Spring dependencies (both direct and transitive) to be included in the project as shown below:
Blog 3

It is important to remember that adding a BOM simply doesn’t import all the declared artifacts. We still need to explicitly include the artifacts that we need except that we don’t have to declare their versions explicitly.

Categories: Maven Tags: , ,

LDAPCON 2013

October 23rd, 2013 No comments

I will be speaking at LDAPCON this year. Here are more details of my talk on Lanyrd.

ldapcon 2013

My Book – Practical Spring LDAP

September 28th, 2013 No comments

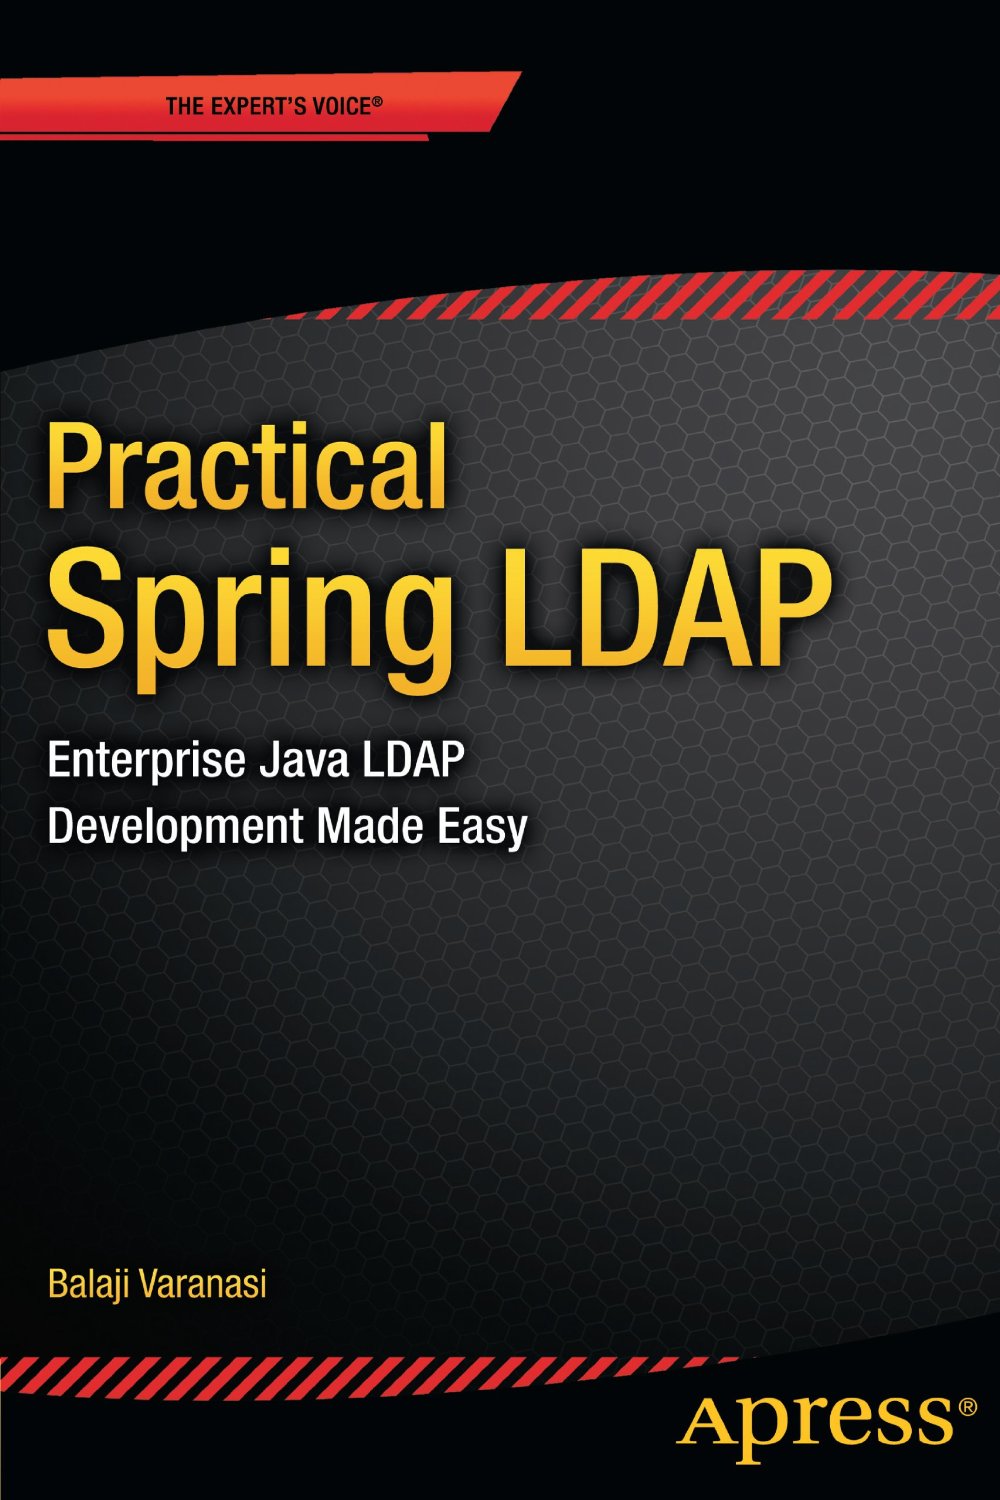
I am pleased to share that Apress will be republishing my Practical Spring LDAP book. You can preorder the book here.

S90.09 – SOA Design & Architecture Lab Exam Details

August 9th, 2013 No comments

In my earlier blog post I shared my experiences taking SOA Architect Certified. In this post, I will shed light on the SOA Design & Architecture Lab Exam (S90.09).

The S90.09 lab is a two hour exam that requires you to answer twenty scenario based complex design problems. Each question in this exam has a scenario and a problem statement. The passing score for this exam is 60%. So you need to get 12 of the 20 questions correct. To successfully pass the exam, you need to apply all the concepts, terminology and patterns that you have learnt while preparing for the previous four exams.

To better understand the types of questions you can expect I have created two example scenario questions below:

Question 1

Service Consumer A needs to send a message to Service A. To successfully complete the request, Service A needs to send the message to Service B. Upon receiving a response from Service B, Service A computes a response and sends the message back to Service Consumer A.

Service Consumer A sends the message in XML format based on Schema X. However Service A only accepts XML messages based on Schema Y. Also, Service B is a legacy service and only communicates using CSV format. What needs to be done to ensure a successful message transfer?

A. The Contract Centralization pattern can be applied so that Service A and Service B accepts messages using Schema X.
B. The Data Format Transformation pattern can be applied between Service A and Service B so that messages can be converted between XML and CSV. The Data Model Transformation pattern can be applied so that messages from Consumer A can be processed by Service A and vice versa.
C. The Official End Point pattern can be applied to create a standardized XML schema to be used by all participating services and consumers
D. None of the above answers

Question 2

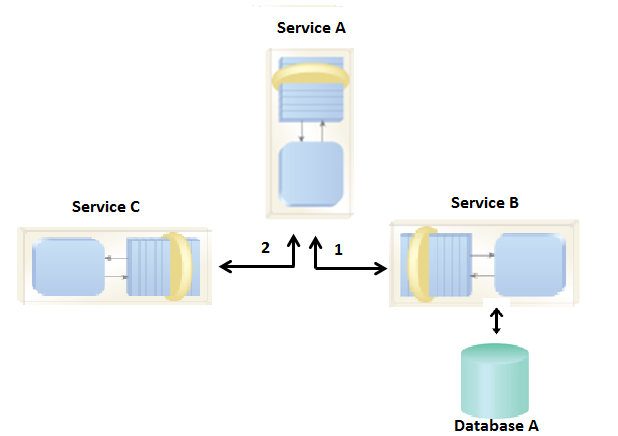
The figure below shows a Service Composition Architecture where Service A communicates with Service B and Service C. Service B uses Database A which is a shared database.

It has been brought to your attention that there has been degradation in the performance of this composition. After some analysis, it has been found that Service C has become part of several other compositions and is being heavily used. This has caused Service C to become unreliable. The load on the shared database has also increased severely causing Service B to become unstable. How can this Service Composition Architecture be changed to improve performance?

A. The Service Autonomy pattern can be applied to Service C to make it more reliable. To address Service B’s instability, the Redundant Implementation pattern can be applied.
B. The Service Data Replication pattern can be applied to Service B by giving a dedicated database that has a copy of Database A. The Redundant Implementation pattern can be applied to Service C to make it more reliable
C. The State Repository pattern can be applied to Service A so that it can store Service A’s data while it waits for responses from Service B and Service C.
D. None of the above answers.

Categories: SOA Tags: ,