Getting Started With Git and GitHub

April 22nd, 2012 No comments

For the last two years, I have been using Git on a windows machine. Recently, I had to install Git on my Mac and connect to Github. Since I have not blogged for such a long time, I thought of jotting down my notes here.

Setting Up Git Locally

1. The first step in this process is to download and install Git locally. The easiest way to do is to download the Git OS X installer from http://code.google.com/p/git-osx-installer/downloads/list The recent version at the time of writing is 1.7.9.4.

Once the download is complete, just run the installer. Upon successful installation, run the following command:

2. The next step is to configure Git. To do this, run the following commands from the command line:

git config –global user.name “YOUR_NAME”
git config –global user.email “YOUR_EMAIL”

3. Now we are ready to create a Git repository. To do that, create a new directory where you want to store your project files. For this blog, I have created a new folder called “hellogit” and moved to the folder in the terminal.

To create a new repository, simply run the following command in the project folder:

4. Now we are ready to add files to our repository. Assume that we have two files in our project test.html and test2.html. Move the files into the hellogit project folder.

Now run the git status command to know the latest status of our repository:

Git comes back saying that we have two untracked files. Git does not automatically track the files in our repository. Instead we need to explicitly add them.

5. To add files to Git, simply run the following command:

If you are new to Git, you might be wondering about the lack of feedback from Git about the add command. Just remember that upon a successful command execution, Git typically does not give you any feedback.

Let’s run the status command to see what happened:

From the above image, you can see that Git added our two files. It also mentions that we have a OS specific file DS_Store that needs to be tracked. We will address that in a minute.

6. When we are done making changes to our project files, we can check them in. To do that, simply run the following command:

In the above command, I have given a commit message “Initial Commit”.

7. Often we will end up with project and OS specific files (DS_Store) in our project folder that we don’t want to check in to Git. We can tell Git to ignore certain files and never track them. To do that, we simply create a .gitignore file that has the name(s) of the file that needs to be ignored.

Now, when the .gitignore file is in place, run the status command and you will see that the .DS_Store file is no longer tracked.

Preparing For Github

Before you can start using Github remote repository, you need to setup SSH keys. These keys are needed to establish secure connection between your computer and Github. To do that follow these steps:
1. Run the following command:

The No such file or directory indicates that you don’t have any SSH keys. Sometimes, the folder might exist but it might not have the id_rsa* SSH key files.

2. The next step is to create a new SSH key. Run the following command:

Hit enter to accept the default location. You will be asked to enter a passphrase. Enter a pass phrase and make a note of it as we will need it again.

Connecting To Github

1. Before we can push our code to a github repository, we need to create an account. Go to http://github.com and create a new account.

2. Once you have created and logged into your account, you need to give github your SSH key. In order to do that, go to your account settings page and click the SSH Keys Navigation Item:

3. Copy the SSH key you created above. To do that, simply go to the .ssh folder and type the following command:

4. Click the Add SSH Key button and enter the key as well as a title.

5. Go back to the terminal and try to connect to github using this command:

When you accept Yes, you will be asked to enter the passphrase:

Check the “Remember Password in keychain” and hit Ok.

6. Now, we are ready to start pushing code to Github. Before we do that we need to create a remote repository on Github. To do that, click the New Repository button:

Enter the following information for the new repository:

Make sure you leave all the fields in their default state.

7. Once the repository has been created on Github, move to your terminal and cd.. into the hellogit project. Then run the following two commands (replace bava with your username):

Now, go back to your Github repository https://github.com/YOUR_USER_NAME/hellogit and you will see that the files have been pushed.

Categories: Git, Solutions Log Tags: ,

Using Apache JAMES Mail Server

January 21st, 2011 11 comments

Recently, I needed an open source email server for testing purposes and I came across JAMES project. The Java Apache Mail Enterprise Server or JAMES is an open source mail application platform that among many other things is a full-fledged e-mail server. It is a pure Java implementation (built on Spring Framework) and supports all the standard e-mail protocols such as SMTP, POP3 etc. In this post, I will quickly demonstrate how you can set up JAMES on your local Windows box and use it to send emails.

Step 1: Download the latest version of JAMES from Apache site. At the time of this writing the latest stable version is 2.3.2 (james-binary-2.3.2.zip). Unzip the downloaded file to a folder on your box. I will be referring to this directory as JAMES_INSTALL_DIR throughout post.

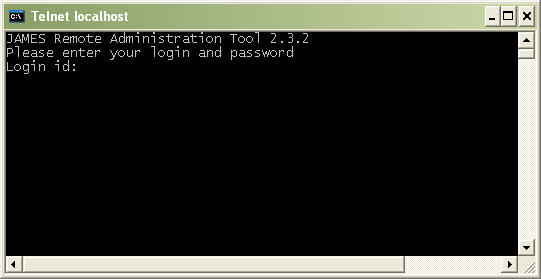
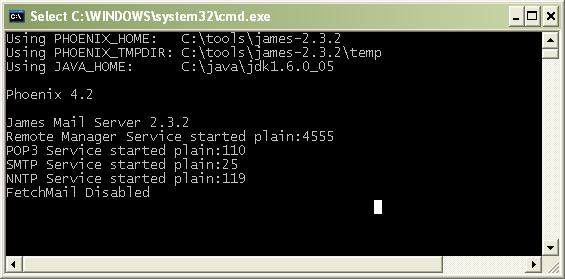
Step 2: To start JAMES, simply run the “run.bat” file under the \bin. This should open up a new window that looks something like this:

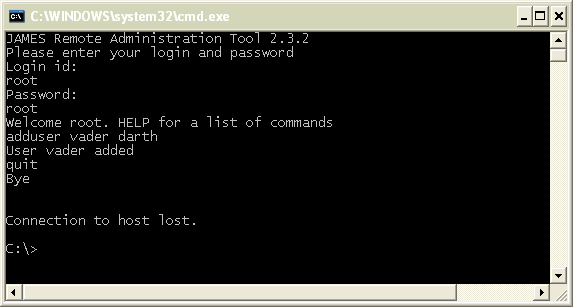
Step 3: Before we can start sending and receiving mails, we need to create a user account on our mail server. JAMES provides a Remote Manager Service on port 4555 that you can telnet into and interact with. Simply launch a new Command Prompt and run the command:
telnet localhost 4555

You should see the Remote Administration Tool and a prompt for your login id.

Enter root as your login id and upon prompt for password enter root. This would log you in. To create a new user run the following command: adduser someusername somepassword

Here are some of the useful commands supported by JAMES:

Command Description
help Display help with commands
listusers
setpassword Sets a user’s password. The format is setpassword username password
deluser Deletes an existing user. The format is deluser username
adduser Adds a new user. The format is adduser username password
countusers Shows the number of existing accounts
listusers Lists all the existing accounts in the mail server
quit Closes the connection

Step 4: Now we have everything installed and setup to send emails. Lets give it a try by running the sample code below:


package com.practicalspring.mail;

import java.util.Properties;

import javax.mail.Message;
import javax.mail.MessagingException;
import javax.mail.Session;
import javax.mail.Transport;
import javax.mail.internet.InternetAddress;
import javax.mail.internet.MimeMessage;

public class Main {
	
	public static void main(String[] args) 
	{
		/***** CHANGE THESE FOUR VARIABLE VALUES TO REFLECT YOUR ENVIRONMENT ******/
		String user = "vader";	// Newly created user on JAMES
		String password = "darth"; // user password
		
		String fromAddress = "vader@localhost"; // newlycreateduser@localhost 
		String toAddress = "SOMEUSER@gmail.com";
		 
		
		// Create a mail session
		Properties properties = new Properties();
		properties.put("mail.smtp.host", "localhost");
		properties.put("mail.smtp.port", "25");
		properties.put("mail.smtp.username", user);
		properties.put("mail.smtp.password", password);
		Session session = Session.getDefaultInstance(properties, null);
		
		try 
		{
			Message message = new MimeMessage(session);
			message.setFrom(new InternetAddress(fromAddress));
			message.setRecipients(Message.RecipientType.TO, InternetAddress.parse(toAddress));
			
			message.setSubject("Email from our JAMES Server");
			message.setText("Luke, I'm your father!!");
			Transport.send(message);
			
			System.out.println("Email sent successfully");
		}
		catch (MessagingException e) 
		{
			e.printStackTrace();
		}
	}
}

Here is the generated email in my inbox:

If you don’t see an email in your inbox in the next couple minutes make sure to check in the Spam folder.

Categories: Mail Server Tags: ,

Flex 4 Custom Validators in 5 Minutes

October 12th, 2010 No comments

Flex out of the box provides several validators that can be used for validating user input. These validators are bundled in the mx.validator package. However, there will be times where we might need to write our own validators. In this post, I will create a custom validator that can be used for validating a combo box.

Creating a custom validator involves extending the mx.validators.Validator class and overriding its doValidation method.


package validators
{
	import mx.validators.Validator;

	public class ComboBoxValidator extends Validator
	{
		public function ComboBoxValidator()
		{
			super();
		}
		
		override protected function doValidation(value:Object):Array 
		{
			return null;
		}
	}
}

The doValidator method holds the logic for validating the passed in value. This value is the data entry control’s property and is passed in by Flex. For our combo box validation we will be using its selectedItem property. Any validation errors will be reported as instances of mx.validators.ValidationResult. With this information in hand, here is the complete implementation of the doValidation method.


override protected function doValidation(value:Object):Array 
{
		var resultArray:Array = [];
		if(value == null) 
		{
			resultArray.push(new ValidationResult(true, "", "", "Validation Failed"));
		}
		return resultArray;
}

And here is the MXML application that uses the custom validator.


<?xml version="1.0" encoding="utf-8"?>
<s:Application xmlns:fx="http://ns.adobe.com/mxml/2009" 
			   xmlns:s="library://ns.adobe.com/flex/spark" 
			   xmlns:mx="library://ns.adobe.com/flex/mx" 
			   xmlns:validators="validators.*"
			   minWidth="955" minHeight="600">
	<fx:Script>
		<![CDATA[
			import mx.validators.Validator;
		]]>
	</fx:Script>

	<fx:Declarations>
		
		<s:ArrayCollection id="countries">
			<s:source>
				<fx:String>Australia</fx:String>
				<fx:String>India</fx:String>
				<fx:String>France</fx:String>
				<fx:String>USA</fx:String>
			</s:source>
		</s:ArrayCollection>
		
		<validators:ComboBoxValidator id="cmbCountryValidator" source="{cmbCountry}" property="selectedItem" />
		
	</fx:Declarations>
	
	<s:layout>
		<s:VerticalLayout paddingLeft="20" paddingTop="20" />
	</s:layout>

	<s:ComboBox id="cmbCountry" dataProvider="{countries}" focusOut="Validator.validateAll( [cmbCountryValidator] )" width="200" />
	
	<s:TextInput width="200" />
	
</s:Application>

Categories: Flex Tags: , ,

JAX-WS Using WebLogic 10.3

October 9th, 2010 1 comment

The Java API for XML Web Services or JAX-WS provides a simple, easy to understand architecture for developing and deploying web services. In this post I will be creating a simple Task List CRUD application that showcases the JAX WS technology. I will be using Eclipse IDE for development and WebLogic 10.3.0 for deployment. Weblogic 10.3.0 supports Java EE 5 specification and implements JSR109. Therefore it does not require any additional jars or configuration such as jax-ws.xml file for running web services.

Here are the requirements for the Task List application:

  • The application should allow new tasks to be created
  • Tasks can be updated, queried and deleted
  • Tasks can be associated with a one or more tags

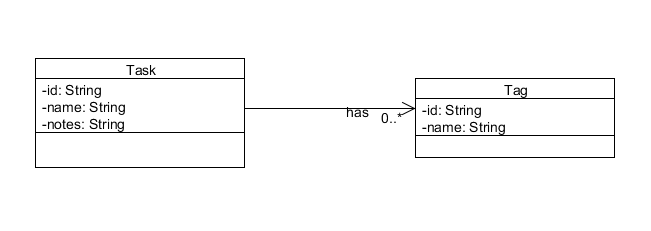
To keep this blog post manageable, I will not be storing the tasks in to a persistent store such as a database. I am also not going to worry about concerns such as authentication and security. We will start the implementation with the domain model which consists of Task and Tag objects. The figure below gives the UML representation of the domain model.

One To Many Relationship B/N Task and Tag

And here is the associated Java code for the two classes:

	package com.inflinx.blog.taskservice.domain;
	
	import java.util.ArrayList;
	import java.util.List;
	
	public class Task {
		
		private String id;
		private String name;
		private String notes;
		private List<Tag> tags = new ArrayList<Tag>();
	
		public String getId() {
			return id;
		}
		public void setId(String id) {
			this.id = id;
		}
		public String getName() {
			return name;
		}
		public void setName(String name) {
			this.name = name;
		}
		public String getNotes() {
			return notes;
		}
		public void setNotes(String notes) {
			this.notes = notes;
		}
		public List<Tag> getTags() {
			return tags;
		}
		public void setTags(List<Tag> tags) {
			this.tags = tags;
		}
	}
	package com.inflinx.blog.taskservice.domain;
	
	public class Tag {
		private String id;
		private String name;
	
		public String getId() {
			return id;
		}
		public void setId(String id) {
			this.id = id;
		}
		public String getName() {
			return name;
		}
		public void setName(String name) {
			this.name = name;
		}
	}

The next step is to create a Web Service class that would service the client’s requests for creating new tasks or updating, removing and querying existing tasks. Here I am taking a Java to WSDL approach where we start with the Java code and let the tools generate WSDL and related schemas at runtime. Web Service classes in JAX WS are simple pojos and use annotations for providing meta data to the container. Here is the starting point of our web service class:

	package com.inflinx.blog.taskservice.service;
	
	import javax.jws.WebService;
	
	@WebService(serviceName="service", targetNamespace="ns.blog.inflinx.com")
	public class TaskManager {
		
		
	}

The @WebService annotation, part of the javax.jws package, indicates that we are building a JAX WS based web service. The targetNamespace attribute assigns a name space to the service defined. If the targetNameSpace is not used, then the reverse package name will be used. The serviceName defines the URL of the deployed service. In this case, the URL to access the service would be: http://locahost:7001/taskservice/service?wsdl The associated XSD can be found at: http://localhost:7001/taskservice/service?xsd=1. If we would like to expose the service under a different URL, say http://localhost:7001/taskservice/api/service we just need to change the serviceName to “api/service”.

Since we will not be using a database to persist tasks, I have added two Maps to hold submitted task and tag data. These maps are initialized with dummy data in the web service constructor as shown in the code below.


	public class TaskManager {
		
		private static Map<String, Task> TASK_DATA = new HashMap<String, Task>();
		private static Map<String, Tag> TAG_DATA = new HashMap<String, Tag>();
		
		public TaskManager() {
			
			TAG_DATA.put("1", new Tag("1", "Web Service"));
			TAG_DATA.put("2", new Tag("2", "Flex"));
			TAG_DATA.put("3", new Tag("3", "Spring"));
			
			Task task = new Task("1", "Write Blog on JAX WS", "This will be part 1");
			List<Tag> tagList = new ArrayList<Tag>();
			tagList.add(TAG_DATA.get("1"));
			task.setTags(tagList);
			TASK_DATA.put("1", task);
			
			Task task2 = new Task("2", "Write Blog on Flex", "This will be a future post");
			List<Tag> tagList2 = new ArrayList<Tag>();
			tagList2.add(TAG_DATA.get("2"));
			task2.setTags(tagList2);
			TASK_DATA.put("2", task2);
		}
	}	

The next step is to add operations to the web service. Here is a simple delete operation with JAX WS annotations.

@WebMethod
public void delete(@WebParam(name="taskId") String taskId) {
	TASK_DATA.remove(taskId);		
}

The @WebMethod annotation is used to indicate a web service operation. The @WebParam is used to provide additional information about the parameters for the generated service. If a name is not specified, then the parameters in the Schema will be named as arg0, arg1 etc. Currently JAX WS does not provide a way to mark a parameter as required. It is not required to annotate web service operations with @WebMethod annotation. However, if you choose to annotate one, then you should annotate all the operations that needs to be exposed as part of the service.

Before we move further, we need to indicate how Java Task objects should be marshalled to XML. In order to do this, we will be using the Java Architecture for XML Binding or JAXB. JAXB provides a convenient model for marshalling Java objects into XML and unmarshalling XML back into Java Objects. The JAXB API constitutes a set of annotations that
enable mapping between Java classes and their XML representations. The table below lists the commonly used JAXB annotations along with their descriptions:

XmlRootElement This annotation indicates a class to be used as a root element in the generated XML document. If the name attribute is not specified then JAXB would automatically use the class name with first letter lowercased as the root element name.
XmlType This annotation can be used to provide additional information for generating the XML schema. For example the propOrder attribute can be used to indicate the order of the child elements in the marshalled document
XmlAccessorType This annotation can be used to control the data that gets serialized. For example, XmlAccessType.FIELD indicates that all non static, non transient fields of a class to be marshalled.
XmlElement This annotation is used to map a JavaBean property to an XML element.
XmlAttribute This annotation is used to map a JavaBean property to an XML attribute.
XmlElementWrapper This annotation can be used to create a wrapper around generated XML for a particular element.

Here are the modified Task and Tag Java classes that uses the above JAXB annotations.

	package com.inflinx.blog.taskservice.domain;
	
	import java.util.ArrayList;
	import java.util.List;
	
	import javax.xml.bind.annotation.XmlAccessType;
	import javax.xml.bind.annotation.XmlAccessorType;
	import javax.xml.bind.annotation.XmlElement;
	import javax.xml.bind.annotation.XmlElementWrapper;
	import javax.xml.bind.annotation.XmlRootElement;
	import javax.xml.bind.annotation.XmlType;

	@XmlAccessorType(XmlAccessType.FIELD)
	@XmlType(name="", propOrder={"id", "name", "notes", "tags"})
	@XmlRootElement(name = "task")
	public class Task {
		
		@XmlElement(required=true)
		private String id;
		
		@XmlElement(required=true)
		private String name;
		
		@XmlElement(required=false)
		private String notes;
		
		@XmlElementWrapper(name="tags", required=false)
		@XmlElement(required=false, name="tag")
		private List<Tag> tags = new ArrayList<Tag>();
		
		// Getters and Setters
		
	}
	package com.inflinx.blog.taskservice.domain;
	
	import javax.xml.bind.annotation.XmlAccessType;
	import javax.xml.bind.annotation.XmlAccessorType;
	import javax.xml.bind.annotation.XmlElement;
	import javax.xml.bind.annotation.XmlRootElement;
	import javax.xml.bind.annotation.XmlType;
	
	@XmlAccessorType(XmlAccessType.FIELD)
	@XmlType(name="", propOrder={"id", "name"})
	@XmlRootElement(name = "tag")
	public class Tag {
		
		@XmlElement(required=true)	
		private String id;
		
		@XmlElement(required=true)
		private String name;
		
		// Getters and setters
	}
	

Finally, here is the rest of the web service implementation.

		@WebMethod	
		public Task findTask(@WebParam(name="taskId") String id) {
					return TASK_DATA.get(id);
		}
		
		@WebMethod
		public @WebResult(name="task") Task[] findAll() {
				return TASK_DATA.values().toArray(new Task[0]);
		}	
		
		@WebMethod
		public void create(@WebParam(name="task") Task task) {
			TASK_DATA.put(task.getId(), task);
		}
			
		@WebMethod
		public void update(@WebParam(name="task") Task task) {
			TASK_DATA.put(task.getId(), task);
		}
			
		@WebMethod
		public void delete(@WebParam(name="taskId") String taskId) {
			TASK_DATA.remove(taskId);
		}

That is all it takes to create a JAX WS web service. Once the web service is deployed to the WebLogic server, you can test it using tools like SoapUI.

Categories: JAX WS, JAXB Tags: ,

SiteMesh And Script Tag

July 29th, 2010 No comments

In a Sitemesh application I recently had to read code inside <script> tags of the decorated pages and use it in the decorator page. After little research, I found this solution. Based on this, I extended the HTMLPageParser and created a ScriptExtractionRule. The ScriptExtractionRule extends the BlockExtractingRule and retrives the content inside script tag.

However with Sitemesh 2.4.1, this solution did not work for the script tag. When I replaced script with any other HTML tag such as form, I was able to read the content inside that tag. Eventually I ended up putting the JavaScript inside a content tag. Here is a portion of the decorated page.

<content tag=”script”>
function somejsfunction() {
}
</content>

Now in the decorator page, I used the tag to read the JavaScript. Hopefully this helps others struggling with similar issue.

Categories: SiteMesh, Solutions Log Tags:

Maven Multi Module Versioning

April 28th, 2010 6 comments

Recently I have been working on a Maven multi module project with ear, war and ejb artifacts. It has been a pleasant experience till I got to versioning my modules. Consider a multi module project with the following structure:

parent-project
|
|- child-moudle
| |
| |–pom.xml
|
|- pom.xml

The parent project pom.xml holds the version information of the parent project:

com.inflinx
project-parent
1.0.0-SNAPSHOT
pom

Now the child module pom contains a reference to the parent information:


	com.inflinx
	project-parent
	1.0.0-SNAPSHOT


4.0.0
com.inflinx
child-module
jar

Now this is where the problem starts. Since all the child modules need to have an explicit reference to the parent pom version, when it is time to do a release, we have to change the version in parent pom and all the child module poms. This can be a real pain and is very error prone. With a little help from Google, here is what I found:

  1. Ceki on his blog suggested using a property in the parent pom to control the version numbering.
  2. Several maven users would like “automatic parent versioning” according this improvement
  3. Use maven release plugin which would automate the process of changing version numbers across the project

Option three seems to be the correct approach to solve this problem here. But I have heard horrible things about the release plugin and how fragile it is. I will be giving it a try soon. I still think that Maven should support automatic parent versioning as an option for users who don’t (or cannot) get to use the release plugin.

Categories: Maven, Solutions Log Tags: ,

Creating Maven Archetypes – Spring MVC Example

April 16th, 2010 7 comments

Maven Archetypes are project templates that allow users easily create new projects. Maven Archetypes are great way to share best practices and enforce consistency beyond Maven’s standard directory structure. For example, an organization can provide its developers an archetype bundled with company’s approved CSS and JavaScript libraries.

Recently, I have been creating a lot of Spring MVC based projects and each time I do, I copy a lot of information (configuration files, css files, dependency information etc) from an existing project. Following the DRY principles, I decided to create several Spring MVC based archetypes that can help me bootstrap my projects quickly. In this post I will share my experiences creating and using a new Maven Archetype.

Maven provides several ways to create a new archetype as described here. Since I have an existing Spring MVC project, I will be using the archetype:create-from-project goal.


Creating Archetype

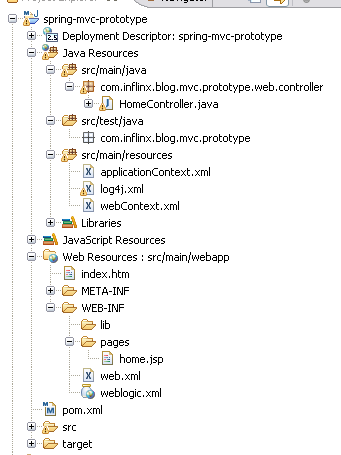
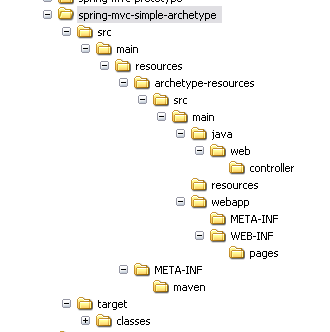
Step 1: Identify the Maven Project that would be used as prototype for the archetype. Make sure it has only the resources (configuration, properties and Java files) that you would like to be part of the archetype. It is recommended to remove IDE specific files (.project, .classpath etc) from the project directory. Here is the spring-mvc-prototype project that I will be using:

Prototype Project Layout

Prototype Project Layout

Step 2: Using command line, navigate to the project folder spring-mvc-prototype and run the following command:

	mvn archetype:create-from-project
	

Upon completion of the command, you should see the message “Archetype created in target/generated-sources/archetype”. The newly created archetype is now under spring-mvc-prototype/target/generated-sources/archetype

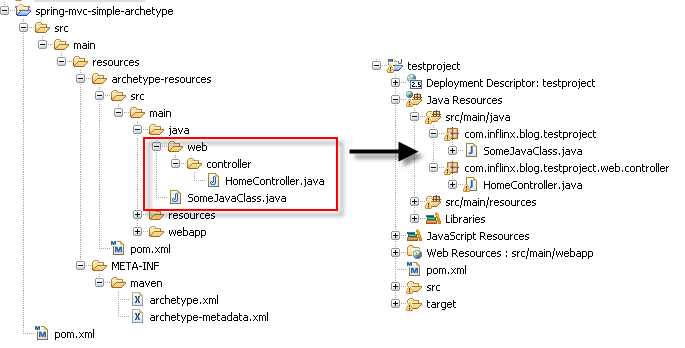
Step 3: The next step is to move the newly created archetype into a separate folder so that it can be tweaked and published. I have moved the content inside the spring-mvc-simple-archetype folder.

Archetype Directory Structure

Archetype Directory Structure

Step 4: Modify the artifactId in the archetype’s pom.xml located at the root of spring-mvc-simple-archetype folder.

Existing pom.xml:

  com.inflinx.blog
  spring-mvc-prototype-archetype
  1.0.0-SNAPSHOT
  maven-archetype
  spring-mvc-prototype-archetype

Modified pom.xml:

	com.inflinx.blog
	spring-mvc-simple-archetype
	1.0.0-SNAPSHOT
	maven-archetype
	spring-mvc-simple-archetype	

Step 5: Modify the finalName in the resource’s pom.xml file located at spring-mvc-simple-archetypesrcmainresourcesarchetype-resources.

		 
		spring-mvc-prototype

		
		${artifactId}
	

During project creation, maven will replace the ${artifactId} expression with the user supplied artifactId value.

Step 6: When creating a project from an archetype, Maven prompts the user for a package name. Maven will create the package in the source folder (srcmainjava) of the project being created and will move the contents under archetype-resourcessrcmainjava into the package.

Maven File Copy

Maven File Copy

While generating the “testproject” above, the user specified the package “com.inflinx.blog.testproject”. So the SomeJavaClass.java file got moved to the root of the package and the HomeController.java got moved under the web.controller subpackage.

Step 7: The next step is to verify that the generated archetype.xml (located under src/main/resources/META-INF/maven) has all the files listed and they are located in the right directories. For example, the HomeController is located under archetype-resources/src/main/java/web/controller/HomeController.java. So there should be an entry under sources in the archetype.xml that looks something like this:

	  
	    src/main/java/com/inflinx/blog/mvcprototype/web/controller/HomeController.java
	  

Step 8: Modify the configuration files to correctly use the ${package} variable. For example, the webContext.xml file is modified so that the controllers located under web.controller sub package are picked up:


Step 9: The final step in creating the archetype is to run the following on command line inside the folder spring-mvc-simple-archetype:

	mvn clean install


Using the archetype

Once the archetype is installed, there are several ways to create a project from it.

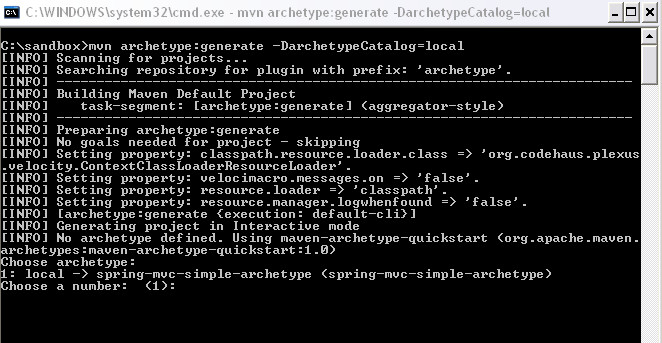
Generate goal: Create an empty folder and run the following command:

 		
 		mvn archetype:generate -DarchetypeCatalog=local
		

This goal would scan the local catalog for archetypes and prompts the user to select an archetype to use.

Command Line Archetype Usage

Command Line Archetype Usage

Once the user enters 1, Maven selects the spring-mvc-simple-archteype for project creation.

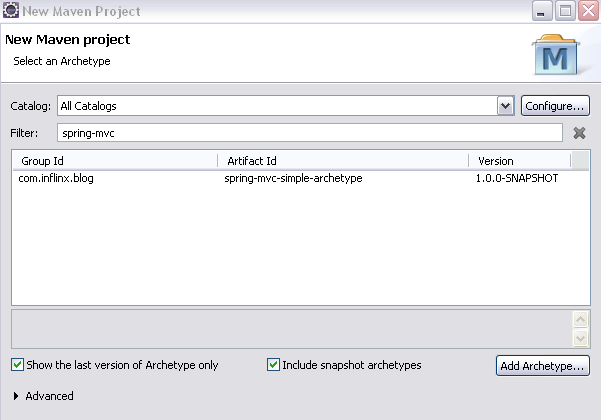
m2Eclipse Plugin: If you are an Eclipse user, use the New Project Wizard and search and select the spring-mvc-simple-archetype.

m2Eclipse Archetype Usage

m2Eclipse Archetype Usage

Using m2Eclipse plugin is a real time saver since it creates the associated IDE specific configuration files.


Adding Custom Properties

On some projects, additional information such as user name or web application context might be needed to generate the project. Here are the steps to prompt the user for information and use it:

Step 1: Add to the archetype-metadata.xml file located under spring-mvc-simple-archetypesrcmainresourcesMETA-INFmaven a required properties entry:


Step 2: Modify the file where you would like to use the information. Below, I have modified weblogic.xml to have the context root value the user has provided:


	        true
	    
		${contextRoot}	
	

When the user uses the archetype with the above modifications, he will be prompted for the contextRoot.

Custom Attribute Usage In Action

Custom Attribute Usage In Action