Maven – Bill Of Materials
As I have been playing with Spring Boot (more on that in the coming blogs), I came across Maven’s Bill of Materials or BOM. Before I get into the details of BOM, let’s look at a common problem with lot of Spring projects. Here is a pom.xml snippet from a Spring Web Project that uses Spring Data JPA:
   <dependency>
      <groupId>org.springframework.data</groupId>
      <artifactId>spring-data-jpa</artifactId>
      <version>1.0.3.RELEASE</version>
   </dependency>
<dependency>
 <groupId>org.springframework</groupId>
 <artifactId>spring-context</artifactId>
    <version>${org.springframework-version}</version>
    <exclusions>
        <!-- Use SLF4J. Not commons logging -->
        <exclusion>
            <groupId>commons-logging</groupId>
            <artifactId>commons-logging</artifactId>
         </exclusion>
    </exclusions>
</dependency>
If you observe, the above configuration would pull different versions of Spring dependencies:
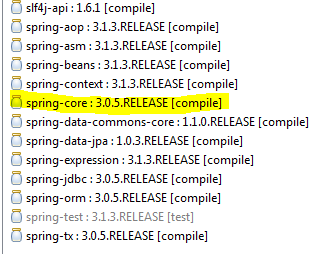
As you can see from the Dependency Hierarchy picture below, Spring Data JPA is pulling an older version of Spring Core.
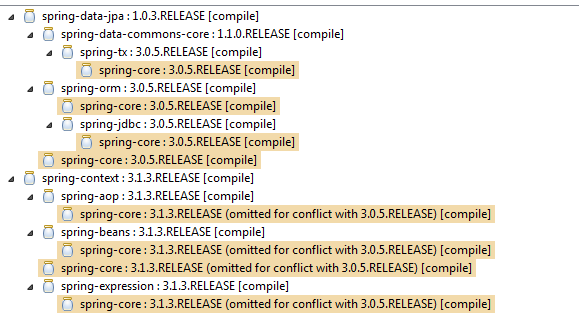
This intermixing of different versions of Spring (or any other library as a matter of fact), is not desirable and can cause unexpected issues. Of Course, this can be fixed by explicitly adding spring-core dependency.
This is where Maven’s “bill of materials” or BOM comes into picture. A BOM is simply a pom.xml file that contains a list of dependencies and their corresponding versions declared under dependencyManagement section. The set of artifacts defined in a BOM make up a “library” or a “stack”. Including a library’s predefined BOM in a project ensures that any library dependency imported into the project (direct or transitive) will be at the correct blessed version.
Now let’s see how the new Spring Framework’s BOM helps alleviate the above problem. We start by adding the following snippet to pom.xml file. Notice that we are using version 4.0.0.RC2.
<dependencyManagement>
    <dependencies>
        <dependency>
            <groupId>org.springframework</groupId>
            <artifactId>spring-framework-bom</artifactId>
            <version>4.0.0.RC2</version>
            <type>pom</type>
            <scope>import</scope>
        </dependency>
    </dependencies>
</dependencyManagement>
The next step is to remove the version information for spring-context dependency:
<dependency>
   <groupId>org.springframework</groupId>
   <artifactId>spring-context</artifactId>
   <exclusions>
      <!-- Use SLF4J. Not commons logging -->
      <exclusion>
         <groupId>commons-logging</groupId>
         <artifactId>commons-logging</artifactId>
      </exclusion>
   </exclusions>
</dependency>
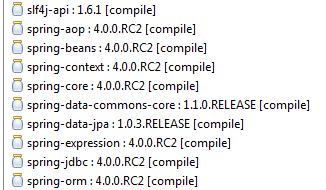
This configuration will result in the right versions of all Spring dependencies (both direct and transitive) to be included in the project as shown below:
It is important to remember that adding a BOM simply doesn’t import all the declared artifacts. We still need to explicitly include the artifacts that we need except that we don’t have to declare their versions explicitly.


