Archive

Archive for the ‘How To’ Category

Spring EJB 3 Integration

March 23rd, 2010 2 comments

Integrating Spring with EJB allows Session and Message Driven Beans leverage existing Spring infrastructure easily. In this post, I will show how to access Spring beans from a Message Driven Bean. This post builds on my previous “EJB 3 Message Driven Beans in WebLogic 10.3” post.

Step 1: Add the following Spring jar files to the APP-INFlib folder of the EAR project.

org.springframework.aop-3.0.0.RELEASE.jar
org.springframework.asm-3.0.0.RELEASE.jar
org.springframework.aspects-3.0.0.RELEASE.jar
org.springframework.beans-3.0.0.RELEASE.jar
org.springframework.context.support-3.0.0.RELEASE.jar
org.springframework.context-3.0.0.RELEASE.jar
org.springframework.core-3.0.0.RELEASE.jar
org.springframework.expression-3.0.0.RELEASE.jar
org.springframework.jms-3.0.0.RELEASE.jar
commons-logging.jar
log4j-1.2.14.jar

Step 2: The next step is to create a Spring context file in the EJB project to hold the bean definitions. Here is the application-Context.xml file with a simple Spring bean:


When deployed, the application-Context file should be at the root of the EJB jar.

Step 3: The next step is to modify the Message Driven Bean to use the messageSuffix Spring bean. Here is the modified MDB:

	public class TestMdb implements MessageListener
	{
		@Autowired
		@Qualifier("messageSuffix")
		private String messageSuffix;
		
		public void onMessage(Message message)
		{
			System.out.println(message + ". " + messageSuffix);
		}
	}

Step 4: To next step is to add SpringBeanAutowiringInterceptor to the MDB. The SpringBeanAutowiringInterceptor is an EJB 3 compliant interceptor that injects Spring beans into @AutoWired annotated fields and methods. Here is the complete MDB:


	package com.inflinx.blog.springmdb;

	import javax.ejb.ActivationConfigProperty;
	import javax.ejb.MessageDriven;
	import javax.interceptor.Interceptors;
	import javax.jms.Message;
	import javax.jms.MessageListener;

	import org.springframework.beans.factory.annotation.Autowired;
	import org.springframework.beans.factory.annotation.Qualifier;
	import org.springframework.ejb.interceptor.SpringBeanAutowiringInterceptor;

	@MessageDriven(
			mappedName = "jndi.blogQueue",
			activationConfig = { @ActivationConfigProperty(
					propertyName = "destinationType", propertyValue = "javax.jms.Queue"
			)}
	)
	@Interceptors(SpringBeanAutowiringInterceptor.class)
	public class TestMdb implements MessageListener
	{
		@Autowired
		@Qualifier("messageSuffix")
		private String messageSuffix;

		public void onMessage(Message message)
		{
			System.out.println(message + ". " + messageSuffix);
		}
	}

The SpringBeanAutowiringInterceptor by default looks for a beanRefContext.xml file in the classpath to create an ApplicationContext. Create the beanRefContext.xml file with the following content:


This completes the Spring EJB integration. Deploy the EJB and run the MessageGenerator test class. You should see the message “TextMessage[ID:<655281.1269371402940.0>, null]. Now With Spring!!” in the server console.

Download the source code for this project here.
Categories: How To, Spring Tags:

EJB 3 Message Driven Beans in WebLogic 10.3

March 21st, 2010 2 comments

In this post, I will show how to create and test Message Driven Beans in WebLogic 10.3. Here are the steps:

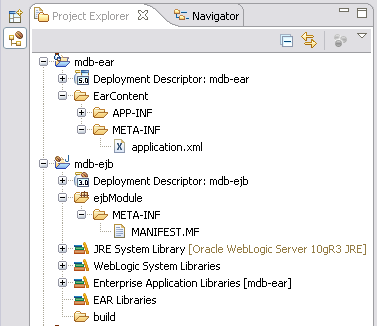
Step 1: The first step is to create projects to hold Message Driven Beans. Using Eclipse IDE, here are the generated EAR and EJB projects:

MDB Project Layout

MDB Project Layout

EAR is the standard packaging mechanism for Java enterprise applications.

Step 2: The next step is to create the Message Driven Bean. The MDB created in this post will be consuming messages from a Distributed Queue with the JNDI name jndi.blogQueue. Refer to the “Distributed JMS Queue on WebLogic 10” post for details on creating Distributed Queues in WebLogic.

	package com.inflinx.blog.springmdb;

	import javax.ejb.ActivationConfigProperty;
	import javax.ejb.MessageDriven;
	import javax.jms.Message;
	import javax.jms.MessageListener;

	@MessageDriven(
			mappedName = "jndi.blogQueue",
			activationConfig = { @ActivationConfigProperty(
					propertyName = "destinationType", propertyValue = "javax.jms.Queue"
				)}
			)

	public class TestMdb implements MessageListener 
	{
	    public void onMessage(Message message) 
	    {
		System.out.println("Received Message: " + message);
	    }
	}

Step 3: The next step is to package the newly created MDB into an EJB which then gets packaged into a ear file for deployment. During development in Eclipse, simply right click on the mdb-ear and click Run -> Run On Server. This IDE deployment assumes that the Oracle Server Adapter is installed in Eclipse and configured to talk to a WebLogic 10.3 server instance.

Step 4: To make sure that the MDB is deployed properly, let us create a MessageGenerator class that adds a message to the queue:


	public class MessageGenerator 
	{
		public static void main(String[] args) throws Exception
		{
			Context context = getInitialContext();
			
			ConnectionFactory connectionFactory = (ConnectionFactory)context.lookup("jndi.blogfactory");
			Queue queue = (Queue) context.lookup("jndi.blogQueue");
			Connection connection = connectionFactory.createConnection();
			Session session = connection.createSession(false, Session.AUTO_ACKNOWLEDGE);
			
			MessageProducer producer = session.createProducer(queue);
	
			TextMessage message = session.createTextMessage();
			message.setText("Hello World");
			producer.send(message);
			
			connection.close();
		}
		
		private static Context getInitialContext() throws Exception
		{
			Hashtable env = new Hashtable();
			env.put(Context.INITIAL_CONTEXT_FACTORY, "weblogic.jndi.WLInitialContextFactory");
			// TODO: Change the server and port name to suit your environment before running the class
			env.put(Context.PROVIDER_URL, "t3://localhost:9001");
			return new InitialContext(env);
		}
	}

Running the above class will add a new TextMessage to the Queue. Once a new message is available, the TestMDB’s onMessage() method gets invoked and you should see the message “Received Message: TextMessage[ID:, null]” in the WebLogic console logs.

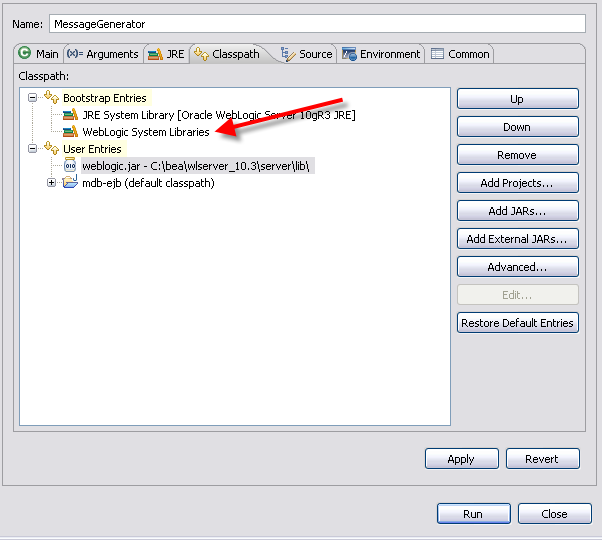
For the above class to run from Eclipse, make sure that you remove “WebLogic System Libraries” and add weblogic.jar to the MessageGenerator “Run Configurations…”.

Message Generator Run Configuration

Message Generator Run Configuration

Otherwise you will end up getting the error:

Exception in thread “main” java.lang.NoClassDefFoundError: weblogic/kernel/KernelStatus
at weblogic.jndi.Environment.(Environment.java:78)
at weblogic.jndi.WLInitialContextFactory.getInitialContext(WLInitialContextFactory.java:117)
at javax.naming.spi.NamingManager.getInitialContext(NamingManager.java:667)
at javax.naming.InitialContext.getDefaultInitCtx(InitialContext.java:288)
at javax.naming.InitialContext.init(InitialContext.java:223)
at javax.naming.InitialContext.(InitialContext.java:197)
at com.inflinx.blog.test.MessageGenerator.getInitialContext(MessageGenerator.java:40)
at com.inflinx.blog.test.MessageGenerator.main(MessageGenerator.java:18)


Download the source code for this post here.