Archive

Archive for the ‘Spring’ Category

Getting Started with Spring Web Flow – Part 1

May 18th, 2012 4 comments

Spring Web Flow is a sub project of Spring that can be used to model user interface activities as flows. For example, consider the scenario of looking up an employee using an Employee directory application. This activity involves entering the employee’s name, filtering through the search results and viewing the details of the employee. Spring Web Flow makes it easy to define and implement such activities as flows.

In this post, I will discuss the details involved in creating a simple web flow application. This post will serve as a foundation to a much complex application we will see in a later post.

Spring Web Flow is an extension to Spring MVC. So, we start out by creating a Spring MVC web application. I have used my Spring MVC Maven Archetype to generate a basic MVC web application named “helloflow”. Here is the structure of the generated project:

MVC Project Structure

The web-Context.xml file has the standard Spring MVC bean declarations:


<beans:beans xmlns="http://www.springframework.org/schema/mvc"
	xmlns:xsi="http://www.w3.org/2001/XMLSchema-instance"
	xmlns:beans="http://www.springframework.org/schema/beans"
	xmlns:context="http://www.springframework.org/schema/context"
	xsi:schemaLocation="http://www.springframework.org/schema/mvc http://www.springframework.org/schema/mvc/spring-mvc-3.0.xsd
		http://www.springframework.org/schema/beans http://www.springframework.org/schema/beans/spring-beans-3.0.xsd
		http://www.springframework.org/schema/context http://www.springframework.org/schema/context/spring-context-3.0.xsd">

	<!-- Enables the Spring MVC @Controller programming model -->
	<annotation-driven />

	<beans:bean class="org.springframework.web.servlet.view.InternalResourceViewResolver">
		<beans:property name="prefix" value="/WEB-INF/jsp/" />
		<beans:property name="suffix" value=".jsp" />
	</beans:bean>
	
	<context:component-scan base-package="com.inflinx.blog.helloflow.web" />
	
</beans:beans>

Similarly, the web.xml file contains the standard DispatcherServlet and ContextLoaderListener declarations:


<web-app version="2.5" xmlns="http://java.sun.com/xml/ns/javaee"
	xmlns:xsi="http://www.w3.org/2001/XMLSchema-instance"
	xsi:schemaLocation="http://java.sun.com/xml/ns/javaee http://java.sun.com/xml/ns/javaee/web-app_2_5.xsd">

	<context-param>
		<param-name>contextConfigLocation</param-name>
		<param-value>classpath:application-Context.xml</param-value>
	</context-param>
	
	<listener>
		<listener-class>org.springframework.web.context.ContextLoaderListener</listener-class>
	</listener>

	<servlet>
		<servlet-name>helloflow</servlet-name>
		<servlet-class>org.springframework.web.servlet.DispatcherServlet</servlet-class>
		<init-param>
			<param-name>contextConfigLocation</param-name>
			<param-value>/WEB-INF/web-Context.xml</param-value>
		</init-param>
		<load-on-startup>1</load-on-startup>
	</servlet>
		
	<servlet-mapping>
		<servlet-name>helloflow</servlet-name>
		<url-pattern>*.html</url-pattern>
	</servlet-mapping>

</web-app>

In order to add Spring Web Flow capabilities to the application, we need to add Web Flow jars to the project. This is done by simply adding the following Maven dependency to pom.xml:


<dependency>
	<groupId>org.springframework.webflow</groupId>
   	<artifactId>spring-webflow</artifactId>
    <version>2.3.1.RELEASE</version>
</dependency> 

We will be using XML to define flows. Before we start defining flows, we need to let the Spring MVC application know about web flow so that flow requests and flow execution can be handled properly. To keep things more modular, we will declare these web flow realted beans in a separate webflow-Context.xml file under WEB-INF folder. Here is the context file with web flow namespace declarations:


<beans xmlns="http://www.springframework.org/schema/beans"
	xmlns:xsi="http://www.w3.org/2001/XMLSchema-instance" 
	xmlns:flow="http://www.springframework.org/schema/webflow-config" 
	xmlns:context="http://www.springframework.org/schema/context"
	xsi:schemaLocation="http://www.springframework.org/schema/beans http://www.springframework.org/schema/beans/spring-beans-3.0.xsd 
	http://www.springframework.org/schema/context http://www.springframework.org/schema/context/spring-context-3.0.xsd
	http://www.springframework.org/schema/webflow-config http://www.springframework.org/schema/webflow-config/spring-webflow-config-2.3.xsd">

		
</beans>	

The first web flow bean that needs to be declared is the flow-registry bean:

	<flow:flow-registry flow-builder-services="flowBuilderServices" id="flowRegistry" base-path="/WEB-INF/flows/">
	<flow:flow-location id="hello" path="hello-flow.xml" /> 
</flow:flow-registry>	

The flow-registry bean serves as the registry of flow definitions. In the above declaration the base-path property tells that all the flows will be under “WEB-INF/flows”. The flow-location element indicates the existence of a “hello-flow” with the id “hello”. The id is important, as we will be using it to launch a flow later.

The flow-registry bean simply loads all the flows. The actual execution of the flow is performed by the flow-executor. The flow-executor bean declaration is shown below:

	<flow:flow-executor id="flowExecutor" flow-registry="flowRegistry" />

The next set of beans are the FlowHandlerAdapter and FlowHandlerMapping. The FlowHandlerAdapter bean is responsible for dispatching requests to flows where as the FlowHandlerMapping is responsible for mapping a request path to a specific flow.


<bean class="org.springframework.webflow.mvc.servlet.FlowHandlerAdapter">
	<property name="flowExecutor" ref="flowExecutor" />
</bean>

<bean class="org.springframework.webflow.mvc.servlet.FlowHandlerMapping">
	<property name="flowRegistry" ref="flowRegistry" />
	<property name="order" value="0" />
</bean>	

The final set of beans that needs to be declared are the MvcViewFactoryCreator and flow-builder-services. These beans are responsible resolving views. By default the MvcViewFactoryCreator will look for the views in the same folder as that of the flow definition.


<bean id="flowViewResolver" class="org.springframework.webflow.mvc.builder.MvcViewFactoryCreator">
	<property name="viewResolvers" ref="internalResourceViewResolver"/>
</bean>

<flow:flow-builder-services id="flowBuilderServices" view-factory-creator="flowViewResolver" />

This concludes the webflow-Context.xml definition. Here is complete context file declaration:


<beans xmlns="http://www.springframework.org/schema/beans"
	xmlns:xsi="http://www.w3.org/2001/XMLSchema-instance" 
	xmlns:flow="http://www.springframework.org/schema/webflow-config" 
	xmlns:context="http://www.springframework.org/schema/context"
	xsi:schemaLocation="http://www.springframework.org/schema/beans http://www.springframework.org/schema/beans/spring-beans-3.0.xsd 
	http://www.springframework.org/schema/context http://www.springframework.org/schema/context/spring-context-3.0.xsd
	http://www.springframework.org/schema/webflow-config http://www.springframework.org/schema/webflow-config/spring-webflow-config-2.3.xsd">

	
	<!-- Registry of executable flows -->
	<flow:flow-registry flow-builder-services="flowBuilderServices" id="flowRegistry" base-path="/WEB-INF/flows/">
		<flow:flow-location id="hello" path="hello-flow.xml" /> 
	</flow:flow-registry>
	
	<!-- Executes flows -->
	<flow:flow-executor id="flowExecutor" flow-registry="flowRegistry" />	
	
	<!-- Dispatches requests to Flows -->
	<bean class="org.springframework.webflow.mvc.servlet.FlowHandlerAdapter">
		<property name="flowExecutor" ref="flowExecutor" />
	</bean>
	
	<!-- Maps specific paths to flows. For example, /hello will look for a flow with id hello -->
	<bean class="org.springframework.webflow.mvc.servlet.FlowHandlerMapping">
		<property name="flowRegistry" ref="flowRegistry" />
		<property name="order" value="0" />
	</bean>
	
	<bean id="flowViewResolver" class="org.springframework.webflow.mvc.builder.MvcViewFactoryCreator" />

	<flow:flow-builder-services id="flowBuilderServices" view-factory-creator="flowViewResolver" />
	
</beans>

The next step is to define a flow. Each flow is made up of states where things tend to happen and transitions that takes the flow from one state to another. We will create a hello flow that has a single state. To do that, simply create a new hello-flow.xml file under WEB-INF/flows folder. Here are the contents of the file:


<flow xmlns="http://www.springframework.org/schema/webflow"
		xmlns:xsi="http://www.w3.org/2001/XMLSchema-instance"
		xsi:schemaLocation="http://www.springframework.org/schema/webflow http://www.springframework.org/schema/webflow/spring-webflow-2.0.xsd">
	
	<view-state id="hellowebflow" />
	
</flow>
	

As you notice, the above flow has only one state: a view state with id hellowebflow. View states displays user interface and invites the user to participate in the flow. So, when the above flow gets executed, Web Flow will look for a JSP page with the name hellowebflow.jsp under WEB-INF/flows and displays it. Here are the contents of the hellowebflow.jsp page:

<html>

	<head>
	
	</head>

	<body>
	
		<h2>Welcome to Webflow</h2>
	
	</body>

</html>

We are almost done with our application. We just need to make two more changes. The first change needs to be made in the web-Context.xml file to let Spring MVC know about the existence of webflow-Context.xml file. This is done by adding the following import element to web-Context.xml file:

<!-- Import the webflow definitions -->
<beans:import resource="webflow-Context.xml" />

Finally, we modify the web.xml file to instruct Spring to hanlde flow requests. This is done by adding a url-pattern element to the DispatcherServlet’s servlet-mapping element.


	<url-pattern>*.flow</url-pattern>
	

Once we have the application deployed, we can launch the flow using the URL: http::/helloflow/hello.flow
WebFlow App

Spring MVC 3.1.1 Archetype

May 18th, 2012 No comments

I have created a new Maven archetype for creating Spring MVC 3.1.1 based web applications.

To install the archetype, download the file and simply run the following command:

mvn install:install-file -DgroupId=com.inflinx.blog -DartifactId=spring-mvc-web-archetype -Dversion=1.0.0 -Dpackaging=jar -Dfile=spring-mvc-web-archetype-1.0.0.jar

The above command needs to be run from the directory where you have placed the downloaded file.

To use the installed archetype run the following command from your project folder:

mvn archetype:generate -DarchetypeGroupId=com.inflinx.blog -DarchetypeArtifactId=spring-mvc-web-archetype -DarchetypeVersion=1.0.0 -DgroupId=com.inflinx.blog -DartifactId=YOUR_PROJECT_NAME -DartifactVersion=1.0.0 -DinteractiveMode=false

If you are interested in creating your own archetypes refer to my Creating Maven Archetypes – Spring MVC Example blog post.

Categories: Maven, Spring Tags: ,

My Book – Practical Spring LDAP

May 17th, 2012 1 comment

I am excited to share that my “Practical Spring LDAP” book is now available on Amazon.

This is the only book the provides a complete coverage of Spring LDAP Framework. More details are available at the book’s website.

Categories: Ldap, Spring Tags: ,

Custom JSR 303 Constraints

April 24th, 2012 No comments

In my previous blog post I talked about validating Spring Web applications using JSR 303 annotations. In that post, we used the out of the box JSR 303 constraints such as @NotEmpty and @Size. These out of the box constraints should be sufficient for most cases. However, there will be situations where you want to develop custom constraints. In this post, we will look at creating a custom constraint
that validates the ISBN number of a book in our Online Bookstore Admin application.

Each JSR 303 validation constraint consists of two parts. The first part is the constraint annotation itself.

package com.inflinx.blog.bookstore.constraint;

import java.lang.annotation.Documented;
import java.lang.annotation.ElementType;
import java.lang.annotation.Retention;
import java.lang.annotation.RetentionPolicy;
import java.lang.annotation.Target;

import javax.validation.Constraint;
import javax.validation.Payload;

@Target({ElementType.FIELD})
@Retention(RetentionPolicy.RUNTIME)
@Documented
@Constraint(validatedBy=IsbnValidator.class)
public @interface Isbn 
{
	String message() default "{Isbn.message}";

	Class[] groups() default {};

	Class[] payload() default {};
}

The JSR 303 specification requires each constraint annotation to define the following three attributes:

  • message – The error message that gets returned upon validation failure. Here we have defined the default value Isbn.message that acts as a resource bundle key. It is possible to just hard code a message by simply omitting the braces.
  • groups – This defines the constraint groups that this annotation needs to be associated with. Here we will use the default group.
  • Payload – This holds the additional metadata information that can be supplied by validation clients. Here we are using the default empty array.

The @Target, @Retention and @Documented annotations are needed for the annotation declaration. The @Constraint annotation declares the validator that we will be using to validate elements annotated with @Isbn constraint.

The next step in creating the custom constraint is defining the validator.

package com.inflinx.blog.bookstore.constraint;

import javax.validation.ConstraintValidator;
import javax.validation.ConstraintValidatorContext;

import org.apache.commons.validator.routines.ISBNValidator;

public class IsbnValidator implements ConstraintValidator
{
	@Override
	public void initialize(Isbn isbn) { }

	@Override
	public boolean isValid(String value, ConstraintValidatorContext validatorContext) 
	{
		if(value == null || "".equals(value))
		{
			return true;
		}
		else
		{
			return ISBNValidator.getInstance().isValid(value);
		}
	}

}

Every constraint validator needs to implement the ConstraintValidator interface. The actual implementation of the IsbnValidator is straightforward. According to the specification, if the annotated element’s value is null or empty the validation should succeed. If you don’t want a null value, the element should be annotated with @NotNull annotation. The actual validation of the ISBN value is delegated to the Apache Validation API.

Now that we have the constraint defined, the next step is to use it in our Book Store application. To do that, we start out by creating a new property in the Book domain class and annotated it with @Isbn annotation. Here is the modified book class:

package com.inflinx.blog.bookstore.domain;

import javax.validation.constraints.Size;

import org.hibernate.validator.constraints.NotEmpty;

import com.inflinx.blog.bookstore.constraint.Isbn;

public class Book
{
	@NotEmpty
	private String name;
	
	@Size(min=1, max=50)
	private String description;
	
	@NotEmpty
	@Isbn
	private String isbn;
	
	public String getIsbn() {
		return isbn;
	}
	public void setIsbn(String isbn) {
		this.isbn = isbn;
	}
	public String getName()
	{
		return name;
	}
	public void setName(String name)
	{
		this.name = name;
	}
	public String getDescription()
	{
		return description;
	}
	public void setDescription(String description)
	{
		this.description = description;
	}
	
	@Override
	public String toString()
	{
		return "Name: " + name + ", Description: " + description + ", ISBN: " + isbn;
	}
}

Then we need to modify the form.jsp file to add the ISBN form field.

 		<form:form method="post" action="book.html" commandName="book">
					<table>
						<tr>
							<td>Name:</td> <td><form:input path="name" /></td> <td><form:errors path="name" /></td>
						</tr>
						<tr>
							<td>Description:</td> <td><form:textarea path="description"/></td> <td><form:errors path="description" /></td>
						</tr>
						<tr>
							<td>ISBN:</td> <td><form:input path="isbn" /></td> <td><form:errors path="isbn" /></td>
						</tr>
						</table>
					<input type="submit" value="Create" />
		</form:form>

The final step in this process is to add a new validation key/value to the messages.properties file. Here is the new messages.properties file:

NotEmpty.book.name=Name is a required field
Size.book.description=Description must be between 1 and 50 characters
Isbn.book.isbn=Please enter a valid ISBN

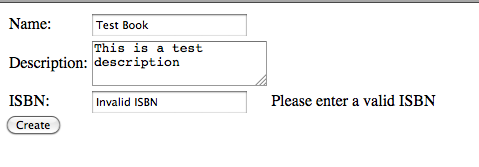
Now, when you submit the form with an invalid ISBN value, you will see a validation error.

Creating Maven Archetypes – Spring MVC Example

April 16th, 2010 7 comments

Maven Archetypes are project templates that allow users easily create new projects. Maven Archetypes are great way to share best practices and enforce consistency beyond Maven’s standard directory structure. For example, an organization can provide its developers an archetype bundled with company’s approved CSS and JavaScript libraries.

Recently, I have been creating a lot of Spring MVC based projects and each time I do, I copy a lot of information (configuration files, css files, dependency information etc) from an existing project. Following the DRY principles, I decided to create several Spring MVC based archetypes that can help me bootstrap my projects quickly. In this post I will share my experiences creating and using a new Maven Archetype.

Maven provides several ways to create a new archetype as described here. Since I have an existing Spring MVC project, I will be using the archetype:create-from-project goal.


Creating Archetype

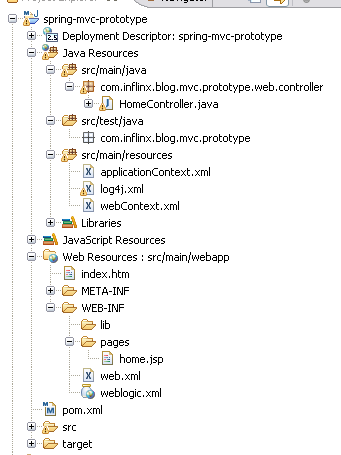
Step 1: Identify the Maven Project that would be used as prototype for the archetype. Make sure it has only the resources (configuration, properties and Java files) that you would like to be part of the archetype. It is recommended to remove IDE specific files (.project, .classpath etc) from the project directory. Here is the spring-mvc-prototype project that I will be using:

Prototype Project Layout

Prototype Project Layout

Step 2: Using command line, navigate to the project folder spring-mvc-prototype and run the following command:

	mvn archetype:create-from-project
	

Upon completion of the command, you should see the message “Archetype created in target/generated-sources/archetype”. The newly created archetype is now under spring-mvc-prototype/target/generated-sources/archetype

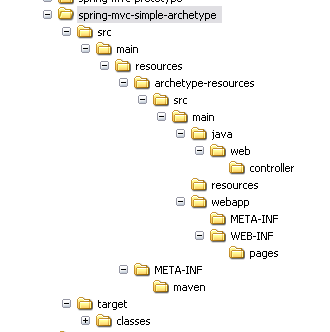
Step 3: The next step is to move the newly created archetype into a separate folder so that it can be tweaked and published. I have moved the content inside the spring-mvc-simple-archetype folder.

Archetype Directory Structure

Archetype Directory Structure

Step 4: Modify the artifactId in the archetype’s pom.xml located at the root of spring-mvc-simple-archetype folder.

Existing pom.xml:

  com.inflinx.blog
  spring-mvc-prototype-archetype
  1.0.0-SNAPSHOT
  maven-archetype
  spring-mvc-prototype-archetype

Modified pom.xml:

	com.inflinx.blog
	spring-mvc-simple-archetype
	1.0.0-SNAPSHOT
	maven-archetype
	spring-mvc-simple-archetype	

Step 5: Modify the finalName in the resource’s pom.xml file located at spring-mvc-simple-archetypesrcmainresourcesarchetype-resources.

		 
		spring-mvc-prototype

		
		${artifactId}
	

During project creation, maven will replace the ${artifactId} expression with the user supplied artifactId value.

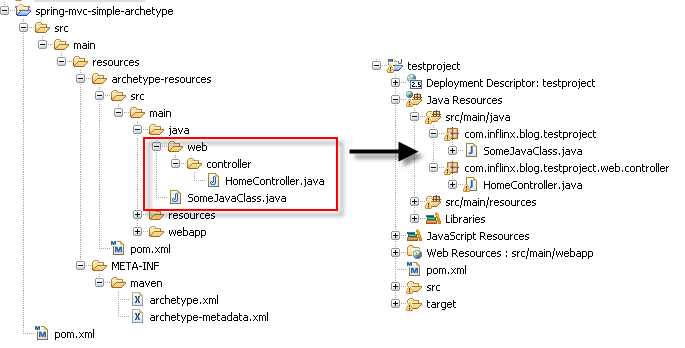
Step 6: When creating a project from an archetype, Maven prompts the user for a package name. Maven will create the package in the source folder (srcmainjava) of the project being created and will move the contents under archetype-resourcessrcmainjava into the package.

Maven File Copy

Maven File Copy

While generating the “testproject” above, the user specified the package “com.inflinx.blog.testproject”. So the SomeJavaClass.java file got moved to the root of the package and the HomeController.java got moved under the web.controller subpackage.

Step 7: The next step is to verify that the generated archetype.xml (located under src/main/resources/META-INF/maven) has all the files listed and they are located in the right directories. For example, the HomeController is located under archetype-resources/src/main/java/web/controller/HomeController.java. So there should be an entry under sources in the archetype.xml that looks something like this:

	  
	    src/main/java/com/inflinx/blog/mvcprototype/web/controller/HomeController.java
	  

Step 8: Modify the configuration files to correctly use the ${package} variable. For example, the webContext.xml file is modified so that the controllers located under web.controller sub package are picked up:


Step 9: The final step in creating the archetype is to run the following on command line inside the folder spring-mvc-simple-archetype:

	mvn clean install


Using the archetype

Once the archetype is installed, there are several ways to create a project from it.

Generate goal: Create an empty folder and run the following command:

 		
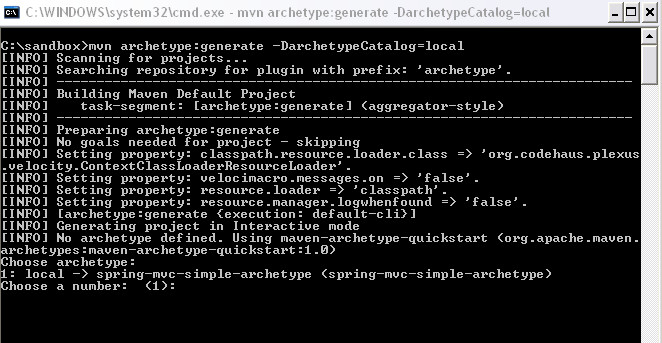
 		mvn archetype:generate -DarchetypeCatalog=local
		

This goal would scan the local catalog for archetypes and prompts the user to select an archetype to use.

Command Line Archetype Usage

Command Line Archetype Usage

Once the user enters 1, Maven selects the spring-mvc-simple-archteype for project creation.

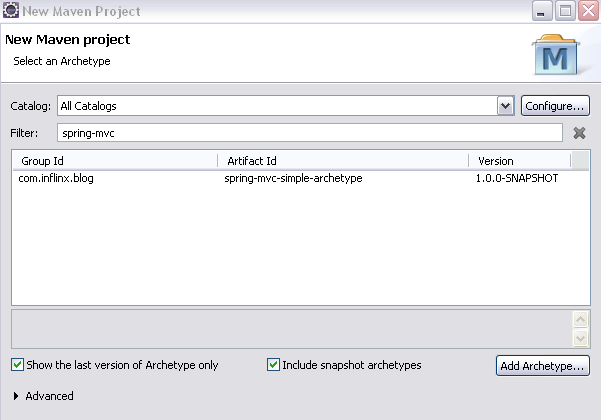
m2Eclipse Plugin: If you are an Eclipse user, use the New Project Wizard and search and select the spring-mvc-simple-archetype.

m2Eclipse Archetype Usage

m2Eclipse Archetype Usage

Using m2Eclipse plugin is a real time saver since it creates the associated IDE specific configuration files.


Adding Custom Properties

On some projects, additional information such as user name or web application context might be needed to generate the project. Here are the steps to prompt the user for information and use it:

Step 1: Add to the archetype-metadata.xml file located under spring-mvc-simple-archetypesrcmainresourcesMETA-INFmaven a required properties entry:


Step 2: Modify the file where you would like to use the information. Below, I have modified weblogic.xml to have the context root value the user has provided:


	        true
	    
		${contextRoot}	
	

When the user uses the archetype with the above modifications, he will be prompted for the contextRoot.

Custom Attribute Usage In Action

Custom Attribute Usage In Action

Spring + JTA + JPA + JMS

April 8th, 2010 13 comments

I recently worked on a Spring application that used Hibernate as JPA provider and JTA for transaction demarcation. In this post I will create a simple Order Processing Message Driven Bean that showcases this integration. I will be using an Oracle database and deploy the application on a WebLogic 10.3 server.

To keep things manageable, the Message Driven Bean is designed to consume messages from a Queue. When a new message gets added to the Queue, the Application Server delivers it to the MDB. The MDB then uses a Spring Managed Service/Repository to persist a new “Order” JPA Entity in the database. The application is configured such that this entire process runs in a container managed transaction. I will be using the Blog Queue I created in a previous post.

Step 1: The first step is to create an Order Entity and the corresponding database table to store the newly created orders.

 
package com.inflinx.blog.orderprocessing.domain;

import java.util.Date;

import javax.persistence.Column;
import javax.persistence.Entity;
import javax.persistence.Id;
import javax.persistence.Table;

@Entity
@Table(name="ORDER_TABLE", schema="BLOGDEMO")
public class Order 
{
	@Id
	@Column(name="ORDER_ID")
	private Long id;
	
	@Column(name="NAME")
	private String name;
	
	@Column(name="CREATED_DATE")
	private Date createdDate;

	public Long getId() {
		return id;
	}
	public void setId(Long id) {
		this.id = id;
	}
	public String getName() {
		return name;
	}
	public void setName(String name) {
		this.name = name;
	}
	public Date getCreatedDate() {
		return createdDate;
	}
	public void setCreatedDate(Date createdDate) {
		this.createdDate = createdDate;
	}
}

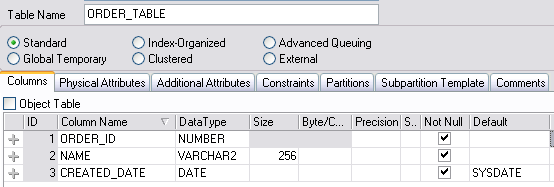
I have created the ORDER_TABLE in an Oracle database under the BLOGDEMO schema:

Order Table

Order Table

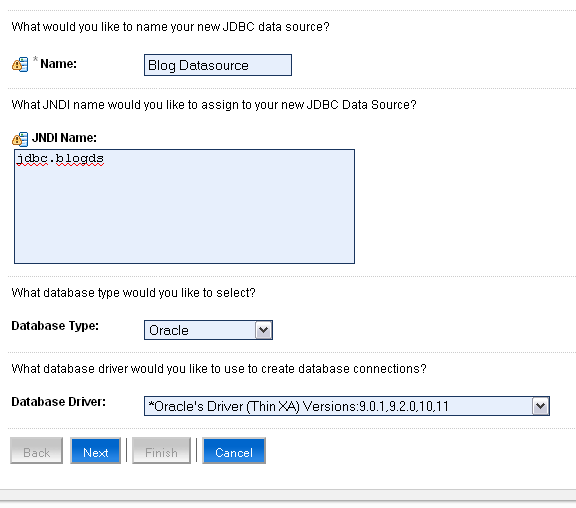
Step 2: In the WebLogic console, create a XA datasource to the database with the JNDI name jdbc.blgods.

XA Blog Data Source

XA Blog Data Source

The XA datasource is necessary for Hibernate to participate in a JTA global transaction. WebLogic also provides an option to emulate XA with the Emulate Two-Phase Commit.

Step 3: The next step is to create an OrderRepository that deals with persistence logic such as creating a new Order.

package com.inflinx.blog.orderprocessing.repository;

import com.inflinx.blog.orderprocessing.domain.Order;

public interface OrderRepository 
{
	public void createOrder(Order order);
}
package com.inflinx.blog.orderprocessing.repository;

import javax.persistence.EntityManager;
import javax.persistence.PersistenceContext;

import org.springframework.stereotype.Repository;

import com.inflinx.blog.orderprocessing.domain.Order;

@Repository("orderRepository")
public class OrderRepositoryImpl implements OrderRepository 
{
	// Spring injected EntityManager
	@PersistenceContext
    private EntityManager entityManager;
	
	@Override
	public void createOrder(Order order) 
	{
		 entityManager.persist(order);
	}
}

Step 4: Following the principles of layered architecture, the next step is to create an OrderService and its implementation.

package com.inflinx.blog.orderprocessing.service;

import com.inflinx.blog.orderprocessing.domain.Order;

public interface OrderService {
	public void createOrder(Order order);
}
package com.inflinx.blog.orderprocessing.service;

import org.springframework.beans.factory.annotation.Autowired;
import org.springframework.beans.factory.annotation.Qualifier;
import org.springframework.stereotype.Service;
import org.springframework.transaction.annotation.Transactional;

import com.inflinx.blog.orderprocessing.domain.Order;
import com.inflinx.blog.orderprocessing.repository.OrderRepository;

@Service("orderService")
@Transactional
public class OrderServiceImpl implements OrderService {

	@Autowired
	@Qualifier("orderRepository")
	private OrderRepository orderRepository;
	
	@Override
	public void createOrder(Order order) {
		// Simply delegate the call to repository layer
		orderRepository.createOrder(order);
	}
}

As you can see, the implementation is annotated with @Transactional to make the service call transactional.

Step 5: The next step is to create a persistence.xml file without any JPA provider information.


			com.inflinx.blog.orderprocessing.domain.Order


Step 6: The next step is to create a Spring configuration application-context.xml file to hold bean and transaction definition. In addition, the file also holds the JPA provider information.


    					hibernate.transaction.factory_class=org.hibernate.transaction.JTATransactionFactory
					hibernate.transaction.manager_lookup_class=org.hibernate.transaction.WeblogicTransactionManagerLookup
					hibernate.current_session_context_class=jta
					hibernate.transaction.flush_before_completion=true						
					hibernate.connection.release_mode=auto


Step 7: With the above configuration in place, the next step is to create a Message Driven Bean that processes incoming messages. The MDB is annotated to use container managed transactions:

 
package com.inflinx.blog.mdb;

import java.util.Date;

import javax.ejb.ActivationConfigProperty;
import javax.ejb.MessageDriven;
import javax.ejb.TransactionAttribute;
import javax.ejb.TransactionAttributeType;
import javax.ejb.TransactionManagement;
import javax.ejb.TransactionManagementType;
import javax.interceptor.Interceptors;
import javax.jms.Message;
import javax.jms.MessageListener;

import org.apache.commons.lang.RandomStringUtils;
import org.springframework.beans.factory.annotation.Autowired;
import org.springframework.beans.factory.annotation.Qualifier;
import org.springframework.ejb.interceptor.SpringBeanAutowiringInterceptor;

import com.inflinx.blog.orderprocessing.domain.Order;
import com.inflinx.blog.orderprocessing.service.OrderService;


@MessageDriven(
		mappedName = "jndi.blogQueue",
		name="orderProcessor",
		activationConfig = { @ActivationConfigProperty(
				propertyName = "destinationType", propertyValue = "javax.jms.Queue"
		)}
)
@Interceptors(SpringBeanAutowiringInterceptor.class)
@TransactionManagement(TransactionManagementType.CONTAINER)
public class OrderProcessor implements MessageListener
{
	@Autowired
	@Qualifier("orderService")
	private OrderService orderService;
	
    @Override
    @TransactionAttribute(TransactionAttributeType.REQUIRED)
	public void onMessage(Message message) 
	{
    	// Create a new Order
    	Order order = new Order();
    	order.setId(System.currentTimeMillis());
    	order.setName(RandomStringUtils.randomAlphabetic(5));
    	order.setCreatedDate(new Date());
    	
    	// Save the order
    	orderService.createOrder(order);
	}
	
}

Step 8: The SpringBeanAutowiringInterceptor by default looks for a beanRefContext.xml file to create a spring context. So the final step in the process is to create a beanRefContext.xml with a reference to the application-context.xml.


				application-context.xml


Now when a new message gets added to the Queue, the onMessage method will run inside a transaction and will create a new Order. Here is a new Order record in the database:

Order Table Populated

Order Table Populated

Categories: JMS, JPA, JTA, Spring Tags: , , ,

Spring EJB 3 Integration

March 23rd, 2010 2 comments

Integrating Spring with EJB allows Session and Message Driven Beans leverage existing Spring infrastructure easily. In this post, I will show how to access Spring beans from a Message Driven Bean. This post builds on my previous “EJB 3 Message Driven Beans in WebLogic 10.3” post.

Step 1: Add the following Spring jar files to the APP-INFlib folder of the EAR project.

org.springframework.aop-3.0.0.RELEASE.jar
org.springframework.asm-3.0.0.RELEASE.jar
org.springframework.aspects-3.0.0.RELEASE.jar
org.springframework.beans-3.0.0.RELEASE.jar
org.springframework.context.support-3.0.0.RELEASE.jar
org.springframework.context-3.0.0.RELEASE.jar
org.springframework.core-3.0.0.RELEASE.jar
org.springframework.expression-3.0.0.RELEASE.jar
org.springframework.jms-3.0.0.RELEASE.jar
commons-logging.jar
log4j-1.2.14.jar

Step 2: The next step is to create a Spring context file in the EJB project to hold the bean definitions. Here is the application-Context.xml file with a simple Spring bean:


When deployed, the application-Context file should be at the root of the EJB jar.

Step 3: The next step is to modify the Message Driven Bean to use the messageSuffix Spring bean. Here is the modified MDB:

	public class TestMdb implements MessageListener
	{
		@Autowired
		@Qualifier("messageSuffix")
		private String messageSuffix;
		
		public void onMessage(Message message)
		{
			System.out.println(message + ". " + messageSuffix);
		}
	}

Step 4: To next step is to add SpringBeanAutowiringInterceptor to the MDB. The SpringBeanAutowiringInterceptor is an EJB 3 compliant interceptor that injects Spring beans into @AutoWired annotated fields and methods. Here is the complete MDB:


	package com.inflinx.blog.springmdb;

	import javax.ejb.ActivationConfigProperty;
	import javax.ejb.MessageDriven;
	import javax.interceptor.Interceptors;
	import javax.jms.Message;
	import javax.jms.MessageListener;

	import org.springframework.beans.factory.annotation.Autowired;
	import org.springframework.beans.factory.annotation.Qualifier;
	import org.springframework.ejb.interceptor.SpringBeanAutowiringInterceptor;

	@MessageDriven(
			mappedName = "jndi.blogQueue",
			activationConfig = { @ActivationConfigProperty(
					propertyName = "destinationType", propertyValue = "javax.jms.Queue"
			)}
	)
	@Interceptors(SpringBeanAutowiringInterceptor.class)
	public class TestMdb implements MessageListener
	{
		@Autowired
		@Qualifier("messageSuffix")
		private String messageSuffix;

		public void onMessage(Message message)
		{
			System.out.println(message + ". " + messageSuffix);
		}
	}

The SpringBeanAutowiringInterceptor by default looks for a beanRefContext.xml file in the classpath to create an ApplicationContext. Create the beanRefContext.xml file with the following content:


This completes the Spring EJB integration. Deploy the EJB and run the MessageGenerator test class. You should see the message “TextMessage[ID:<655281.1269371402940.0>, null]. Now With Spring!!” in the server console.

Download the source code for this project here.

Categories: How To, Spring Tags: