Archive

Posts Tagged ‘Spring MVC’

Using Logback With Spring MVC

January 7th, 2014 No comments

Logback is yet another logging framework intended to be successor of the widely used Log4J. I came across Logback several years ago but it never paid a whole lot of attention to it. Now I am convinced that Logback and SLF4J is the way logging should be done in applications.

So, what’s so great about Logback. The Logback site lists several reasons why Logback is superior. Here are my three favorite reasons:

  • Logback is faster than Log4J – Logging is a cross cutting concern and ideally shouldn’t have any impact on the application’s performance. But with the number of log statements that enterprise applications contain these days, this is not true. So the faster the logging framework, the better in my opinion.
  • Stack traces contain packaging data – Here is an example stack trace logged using Logback:

    java.lang.RuntimeException: null
    at com.inflinx.spring4.web.controller.HomeController.home(HomeController.java:15) ~[HomeController.class:na]
    at sun.reflect.NativeMethodAccessorImpl.invoke0(Native Method) ~[na:1.7.0_45]
    at sun.reflect.NativeMethodAccessorImpl.invoke(NativeMethodAccessorImpl.java:57) ~[na:1.7.0_45]
    at sun.reflect.DelegatingMethodAccessorImpl.invoke(DelegatingMethodAccessorImpl.java:43) ~[na:1.7.0_45]
    at java.lang.reflect.Method.invoke(Method.java:606) ~[na:1.7.0_45]
    at org.springframework.web.method.support.InvocableHandlerMethod.invoke(InvocableHandlerMethod.java:214) ~[spring-web-4.0.0.RELEASE.jar:4.0.0.RELEASE]
    at org.springframework.web.method.support.InvocableHandlerMethod.invokeForRequest(InvocableHandlerMethod.java:132) ~[spring-web-4.0.0.RELEASE.jar:4.0.0.RELEASE]

    Notice the packaging information at the end of each line inside [] brackets. It definitely simplifies troubleshooting issues.

  • Condensed package names – It is possible to instruct Logback to generate condensed package names in the logs. With this feature turned on, you will see o.s.w.servlet.DispatcherServlet in the logs instead of org.springframework.web.servlet.DispatcherServlet.

    If you like this feature and want to use it in Log4J, check out EnhancedPatternLayout

Though, you can directly use Logback in your application, it usually make sense to use a logging facade like SLF4J.

Now that I have convinced you that Logback is a better option, let’s see what it takes to use it. If we are using Maven, using Logback simply involves declaring the following dependencies:

The next step is to create logback.xml file under src/main/resources and logback-test.xml file under src/test/resources. Logback first looks for logback-test.xml file in classpath. If it doesn’t find it, it tries to look for logback.xml file. This makes it easy to have different configurations for test and production.

The logback.xml file is similar to log4j.xml file that many of us are familiar with. Here is a sample logback.xml file that you can use:

It is possible for Logback to automatically scan for configuration modifications and reload its configuration. The scan and scanPeriod attributes can be used to set the reload information. This is done using scan and scanPeriod attributes in the configuration element. The layout pattern used above will produce logs like this:

12:53:34.374 [localhost-startStop-1] DEBUG o.s.c.e.PropertySourcesPropertyResolver – Searching for key ‘spring.liveBeansView.mbeanDomain’ in [systemProperties]

Now we are all set to use Logback. Here is an example from the Spring 4 starter web project that demo’s Logback usage:
Categories: Logback Tags: ,

Spring 4 Web Starter Project

January 6th, 2014 No comments

In this blog post, I will share a Spring 4 based starter project that can be used to jump start Spring based web development. The complete project is available on GitHub at: spring4-web

This starter project has the following features:

  • Completely updated to use Spring 4.0 and Servlet 3.0. You will need containers such as Tomcat 7 to use this project.
  • Fully working pom.xml file with all the required dependencies
  • Working configuration with a sample controller
  • A “catch all” global exception handler using @ControllerAdvice
  • Support for message resources
  • A sample Spring configuration file for middle tier (service/repository layers)
  • SLF4J and Logback for logging
  • Spring BOM file included in the pom so that correct versions of Spring projects are bundled

If you have generated Spring Web projects using my archetype, you will notice that this starter project is not vastly different. Here are few changes/best practices I am following this time:

  1. The config files no longer contain XSD version. So instead of using http://www.springframework.org/schema/beans http://www.springframework.org/schema/beans/spring-beans-3.2.0.xsd in the configuration files, I will be using http://www.springframework.org/schema/beans http://www.springframework.org/schema/beans/spring-beans.xsd
  2. All the JSP pages are now moved to WEB-INF/views folder. Using Spring’s , I have eleminated the need to have a starter .jsp or html page under the project root.
  3. All the Spring configuration files are now located under src/main/resources/spring folder.

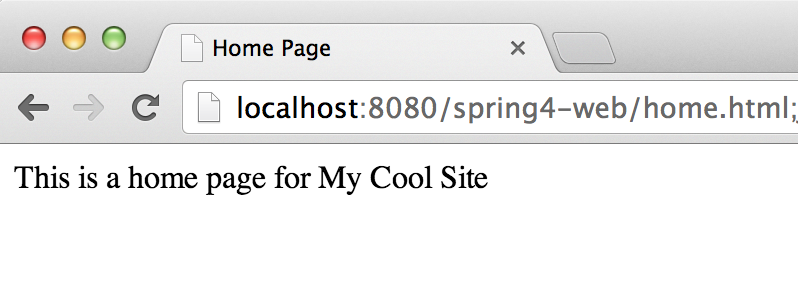
If you get the project running successfully, you should see a page similar to this:
Spring 4 Web Starter Project - 1

If there is an error in the application, you will see the exception page with a correlation id. I am using Apache Commons Lang’s RandomStringUtils to generate correlation ids.
Spring 4 Web Starter Project - 2

I will be using this starter project in my future blogs to demo some of Spring 4’s new features. Give this a try and let me know what you think.

Categories: Solutions Log, Spring Tags: ,

Spring MVC – Sitemesh 3 Integration

October 9th, 2012 4 comments

Sitemesh is a web page layout/decoration framework that makes it easy to create applications with consistent layout/look and feel. I have used Sitemesh 2 for years and absolutely love it. Sitemesh 3 is a complete rewrite of the framework and has huge performance benefits. A full list of the new features is listed here. In this blog I will share the steps needed for integrating Sitemesh 3 in a Spring MVC application.

1. We start by creating a Maven based web application using my Spring archetype. Here is the generated pom.xml file with dependencies:


<?xml version="1.0" encoding="UTF-8"?>
<project xmlns="http://maven.apache.org/POM/4.0.0" xmlns:xsi="http://www.w3.org/2001/XMLSchema-instance" xsi:schemaLocation="http://maven.apache.org/POM/4.0.0 http://maven.apache.org/maven-v4_0_0.xsd">

	<modelVersion>4.0.0</modelVersion>
	<groupId>com.inflinx.blog</groupId>
	<artifactId>sitemesh3</artifactId>
	<name>sitemesh3</name>
	<packaging>war</packaging>
	<version>1.0.0</version>
	
	<properties>
		<org.springframework-version>3.1.1.RELEASE</org.springframework-version>
	</properties>
	
	<dependencies>
		<dependency>
			<groupId>org.springframework</groupId>
			<artifactId>spring-context</artifactId>
			<version>${org.springframework-version}</version>
			 <exclusions>
		         <exclusion>
		            <groupId>commons-logging</groupId>
		            <artifactId>commons-logging</artifactId>
		         </exclusion>
      		</exclusions>
		</dependency>
		
		<dependency>
			<groupId>org.springframework</groupId>
			<artifactId>spring-webmvc</artifactId>
			<version>${org.springframework-version}</version>
		</dependency>
		
		<dependency>
		     <groupId>cglib</groupId>
		     <artifactId>cglib</artifactId>
		     <version>2.2.2</version>
		     <scope>compile</scope>
		</dependency>
		
		<dependency>
			<groupId>javax.inject</groupId>
			<artifactId>javax.inject</artifactId>
			<version>1</version>
		</dependency>
		
		<dependency>
			<groupId>javax.validation</groupId>
			<artifactId>validation-api</artifactId>
			<version>1.0.0.GA</version>
			<scope>compile</scope>
		</dependency>
		
		<dependency>
			<groupId>org.hibernate</groupId>
			<artifactId>hibernate-validator</artifactId>
			<version>4.2.0.Final</version>
			<scope>compile</scope>
			<exclusions>
				<exclusion>
					<artifactId>slf4j-api</artifactId>
					<groupId>org.slf4j</groupId>
				</exclusion>
			</exclusions>
		</dependency>
	            
		<dependency>
			<groupId>jstl</groupId>
			<artifactId>jstl</artifactId>
			<version>1.2</version>
		</dependency>
	
		<dependency>
      		<groupId>org.slf4j</groupId>
	      	<artifactId>jcl-over-slf4j</artifactId>
	      	<version>1.5.8</version>
  	 	</dependency>
   		<dependency>
      		<groupId>org.slf4j</groupId>
      		<artifactId>slf4j-api</artifactId>
      		<version>1.5.8</version>
   		</dependency>
	   <dependency>
	      <groupId>org.slf4j</groupId>
	      <artifactId>slf4j-log4j12</artifactId>
	      <version>1.5.8</version>
	   </dependency>
	
		<dependency>
			<groupId>log4j</groupId>
			<artifactId>log4j</artifactId>
			<version>1.2.14</version>
		</dependency>
			  
		<dependency>
			<groupId>commons-lang</groupId>
			<artifactId>commons-lang</artifactId>
			<version>2.6</version>
		</dependency>            
		
		<dependency>
			<groupId>javax.servlet</groupId>
			<artifactId>jsp-api</artifactId>
			<version>2.0</version>
	    	<scope>provided</scope>
		</dependency>				
 
	</dependencies>
    <build>
        <plugins>
        	<plugin>
			    <groupId>org.mortbay.jetty</groupId>
			    <artifactId>maven-jetty-plugin</artifactId>
			</plugin>
            <plugin>
                <artifactId>maven-eclipse-plugin</artifactId>
                <version>2.9</version>
                <configuration>
                    <additionalProjectnatures>
                        <projectnature>org.springframework.ide.eclipse.core.springnature</projectnature>
                    </additionalProjectnatures>
                    <additionalBuildcommands>
                        <buildcommand>org.springframework.ide.eclipse.core.springbuilder</buildcommand>
                    </additionalBuildcommands>
                    <downloadSources>true</downloadSources>
                    <downloadJavadocs>true</downloadJavadocs>
                </configuration>
            </plugin>
            <plugin>
                <groupId>org.apache.maven.plugins</groupId>
                <artifactId>maven-compiler-plugin</artifactId>
                <version>2.3.2</version>
                <configuration>
                    <source>1.6</source>
                    <target>1.6</target>
                    <compilerArgument>-Xlint:all</compilerArgument>
                    <showWarnings>true</showWarnings>
                    <showDeprecation>true</showDeprecation>
                </configuration>
            </plugin>
        </plugins>
    </build>
</project>


2. To the web application we add the following Sitemesh 3 maven dependency:

	
		<dependency>
			<groupId>org.sitemesh</groupId>
			<artifactId>sitemesh</artifactId>
			<version>3.0-alpha-2</version>	
		</dependency>


3. We then create a Sitemesh decorator containing common layout/look and feel that all the pages should have. Create a main.jsp file under WEB-INF/decorator folder with the following contents:


<html>
  <head>
    <title><sitemesh:write property='title'/></title>
    <sitemesh:write property='head'/>
  </head>
  
  <body>
    <div style="color: red">
    	<sitemesh:write property='body'/>
    </div>
  </body>
  
</html> 

4. The next step is to let Sitemesh know about this decorator. This is done via sitemesh.xml file located under WEB-INF folder.

	<?xml version="1.0" encoding="UTF-8"?>
	<sitemesh>
 		<mapping path="/*" decorator="/WEB-INF/decorator/main.jsp"/>
	</sitemesh>

In the above configuration file, the mapping element tells Sitemesh to apply main.jsp decorator to all the pages. Other configuration options provided by Sitemesh 3 are listed here.

5. The final step in the integration is to add Sitemesh filter to web.xml.

  	<filter>
    	<filter-name>sitemesh</filter-name>
    	<filter-class>org.sitemesh.config.ConfigurableSiteMeshFilter</filter-class>
  	</filter>

 	<filter-mapping>
    	<filter-name>sitemesh</filter-name>
    	<url-pattern>/*</url-pattern>
  	</filter-mapping>

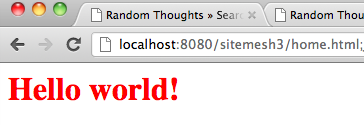
When you run the application you should see the red font color applied due to main.jsp decorator:

Sitemesh App

Categories: SiteMesh, Spring Tags: ,

Spring Async And Future – Report Generation Example

September 9th, 2012 9 comments

Spring 3.0 introduced the @Async annotation for executing tasks asynchronously. The asynchronous capabilities are highly useful in situations where we need to execute a long running task before allowing user input. For example, every time we open a Gmail message with attachment, Gmail performs a anti-virus scan before showing the download link to the user.

In this blog post, I will kick off a long running report asynchronously. Then I will use JQuery to periodically check if the report has been created. When the report is finally available, a link to the report is shown to the user.

We start by creating a ReportService as shown below. The generateReport method returns java.util.concurrent.Future interface. This interface allows the caller to retrieve the execution result at later time.

package com.inflinx.blog.springfuture.service;

import java.util.concurrent.Future;

import com.inflinx.blog.springfuture.domain.Report;

public interface ReportService {
	
	public Future generateReport();
	
}

The report service implementation is shown below. We simulate the “long running process” by calling the sleep method on the current thread. The method returns AsyncResult instance with the newly created Report as pass through value.


package com.inflinx.blog.springfuture.service;

import java.util.concurrent.Future;

import org.springframework.scheduling.annotation.Async;
import org.springframework.scheduling.annotation.AsyncResult;
import org.springframework.stereotype.Service;

import com.inflinx.blog.springfuture.domain.Report;

@Service("reportsService")
public class ReportServiceImpl implements ReportService {

	@Async
	public Future generateReport() {
		
		try {
			Thread.sleep(15000);
		} catch (InterruptedException e) {
			e.printStackTrace();
		}
		
		Report report = new Report();
		report.setName("New Report");
		report.setDescription("New Report Description");
		
		return new AsyncResult(report);
	}
	
}

We complete the service layer implementation by adding the following Spring configuration file:


<?xml version="1.0" encoding="UTF-8"?>
<beans xmlns="http://www.springframework.org/schema/beans"
       xmlns:xsi="http://www.w3.org/2001/XMLSchema-instance"
       xmlns:context="http://www.springframework.org/schema/context"
       xmlns:util="http://www.springframework.org/schema/util"
       xmlns:jee="http://www.springframework.org/schema/jee"
       xmlns:task="http://www.springframework.org/schema/task"
       xsi:schemaLocation="http://www.springframework.org/schema/beans http://www.springframework.org/schema/beans/spring-beans-3.0.xsd 
       http://www.springframework.org/schema/util http://www.springframework.org/schema/util/spring-util-3.0.xsd
       http://www.springframework.org/schema/context http://www.springframework.org/schema/context/spring-context-3.0.xsd
       http://www.springframework.org/schema/jee http://www.springframework.org/schema/jee/spring-jee-3.0.xsd
       http://www.springframework.org/schema/task http://www.springframework.org/schema/task/spring-task-3.0.xsd">

    <context:annotation-config />
    
    <context:component-scan base-package="com.inflinx.blog.springfuture.service" />
       
    <task:annotation-driven />
       
</beans>       		

Now that we have completed our service layer, let’s create an MVC Controller that uses the ReportService to create a new report. The new report is then saved in the user’s session.

package com.inflinx.blog.springfuture.web.controller;

import java.util.concurrent.Future;

import javax.servlet.http.HttpSession;

import org.springframework.beans.factory.annotation.Autowired;
import org.springframework.beans.factory.annotation.Qualifier;
import org.springframework.stereotype.Controller;
import org.springframework.web.bind.annotation.RequestMapping;
import org.springframework.web.bind.annotation.RequestMethod;

import com.inflinx.blog.springfuture.domain.Report;
import com.inflinx.blog.springfuture.service.ReportService;

@Controller
public class HomeController 
{
	@Autowired
	@Qualifier("reportsService")
	private ReportService reportService;
	
	@RequestMapping(value="/home.html", method=RequestMethod.GET)
	public String showHome(HttpSession session) 
	{
		Future report = reportService.generateReport();
		
		session.setAttribute("report", report);
		
		return "home";
	}	
}

To this controller, we then add a method that returns the status of the report generation. The method implementation simply retrieves the Future object and invokes the isDone method to check the status of the running task.

	@RequestMapping("/reportstatus.json")
	@ResponseBody
	public String reportStatus(HttpSession session) {
		Future report = (Future)session.getAttribute("report");
		
		if(report.isDone()) {
			System.out.println("Report Generation Done");
			return "COMPLETE";
		}
		else {
			System.out.println("Still Working on Report");
			return "WORKING";
		}
	}

We then add a method to the controller that shows the generated report as shown below:


@RequestMapping(value="/report.html", method=RequestMethod.GET)
	public String showReport(HttpSession session, Model model) throws InterruptedException, ExecutionException 
	{
		Future report = (Future)session.getAttribute("report");
		
		Report r = report.get();
		model.addAttribute("report", r);
		
		return "report";
	}

The report.jsp view returned by the above method is shown below:


<html>
<head>
	<title>Home</title>
</head>
<body>
<h1>
	Generated Report
</h1>

 Name: ${report.name} <br />
 Description: ${report.description}

</body>
</html>

We finally tie everything in the home.jsp view that gets returned by the showHome method. In the home.jsp, we use JQuery’s setInterval method to call the reportstatus.json URL every two seconds. Once we get the “COMPLETE” response, we show the download link.


<html>
<head>
	<title>Home</title>

<script type="text/javascript" src="https://ajax.googleapis.com/ajax/libs/jquery/1.8.1/jquery.min.js"></script>

<script type="text/javascript">
	
	$(document).ready(function() {
		
		// Check The Status Every 2 Seconds
		var timer = setInterval(function() {
			
			$.ajax({
				  url: 'reportstatus.json',
				  success: function(data) {
					
					if(data === 'COMPLETE') {
						$('#reportLink').html("<a target='_target' href='report.html'>Download Report</a>");	
						clearInterval(timer);
					}
				  }
			});
			
		}, 2000);
	});
		
</script>

</head>
<body>
<h1>
  Report Generator
</h1>

<div id="reportLink">Please Wait While Your Report Is Being Generated</div>

</body>
</html>

Here is a screenshot of the application’s home.jsp page:

Here is a screenshot after the report has been generated:

The screenshot of the newly generated report:

Categories: Spring Tags: , ,

Integrating CAPTCHA Into Spring MVC Web Applications

May 25th, 2012 3 comments

Integrating CAPTCHA in an application involves two simple steps:

  1. Display CAPTCHA Widget
  2. Validate CAPTCHA Reponse

In this blog post, I will be using Google’s reCAPTCHA. Before we can start using reCAPTCHA, we need to sign up for API keys.

Obtaining reCAPTCHA keys

1. Go to the reCAPTCHA Key Signup Page and login using your Google Account.

Enter the your domain name and hit “Create Key”. The generated keys by default are restricted to the specified domain. However, all keys will work on the localhost domain, making it easy to test during development.

Captcha Creation


Make a note of the generated public and private keys. We need both keys in order to generate CAPTCHA and verify response.

Display CAPTCHA Widget

reCAPTCHA provides a Java Library wrapper that makes CAPTCHA generation/verification easier. Maven users can get the jar file with the following dependency:

   <dependency>
		<groupId>net.tanesha.recaptcha4j</groupId>
		<artifactId>recaptcha4j</artifactId>
		<version>0.0.7</version>
	</dependency>

With the dependency added, generating the CAPTCHA Widget simply involves placing the below scriptlet in a JSP page:

	<%
		ReCaptcha captcha = ReCaptchaFactory.newReCaptcha("PUBLIC_KEY", "PRIVATE_KEY", false);
		out.print(captcha.createRecaptchaHtml(null, null));
    %>	

In the above code, we first create an instance of ReCaptcha by passing in the generated public and private key. The third parameter instructs if a noscript tag should to be placed around the generated HTML.

Since, I don’t like using Scriptlets in my JSP pages, I will create a reusable JSP tag that wraps the above code. We start out by creating a CaptchaTag class as shown below:


package com.inflinx.blog.web.tag;

import java.io.IOException;
import java.util.Properties;

import javax.servlet.jsp.JspException;
import javax.servlet.jsp.tagext.SimpleTagSupport;

import org.apache.commons.lang.StringUtils;

import net.tanesha.recaptcha.ReCaptcha;
import net.tanesha.recaptcha.ReCaptchaFactory;

public class CaptchaTag extends SimpleTagSupport
{
	private String publickey;
	private String privatekey;
	private String themeName;
	
	@Override
	public void doTag() throws JspException, IOException 
	{
		ReCaptcha captcha = ReCaptchaFactory.newReCaptcha(publickey, privatekey, false);
		Properties properties = new Properties();
		
		if(StringUtils.isNotEmpty(themeName))
		{
			properties.put("theme", themeName);
		}
		
		String captchaHtml = captcha.createRecaptchaHtml(null, properties);
		getJspContext().getOut().write(captchaHtml);
	}

	public String getThemeName() {
		return themeName;
	}

	public void setThemeName(String themeName) {
		this.themeName = themeName;
	}

	public String getPublickey() {
		return publickey;
	}

	public void setPublickey(String publickey) {
		this.publickey = publickey;
	}

	public String getPrivatekey() {
		return privatekey;
	}

	public void setPrivatekey(String privatekey) {
		this.privatekey = privatekey;
	}
}

The above tag takes has three attributes: public key, private key and theme name. The theme option can be used to control the reCAPTCHA widget’s look and feel. Possible values include: “red”, “white”, “blackglass” or “clean”. The default is the red.

To complete the implementation of the tag, lets create a captcha.tld file under WEB-INF/tlds folder with the following contents:

<taglib xsi:schemaLocation="http://java.sun.com/xml/ns/javaee/web-jsptaglibrary_2_1.xsd"
    xmlns="http://java.sun.com/xml/ns/javaee" xmlns:xsi="http://www.w3.org/2001/XMLSchema-instance" version="2.1">
     
    <tlibversion>1.0</tlibversion>
    <jspversion>2.1</jspversion>
    <shortname>CaptcahTags</shortname>
    <uri>http://blog.inflinx.com</uri>
    <info>Captcha Tags</info>
 
    <tag>
        <name>captcha</name>
        <tagclass>com.inflinx.blog.web.tag.CaptchaTag</tagclass>
        <bodycontent>empty</bodycontent>
        <info>Generates Captcha Widget</info>
        <attribute>
             <name>publickey</name>
             <required>true</required>
			 <rtexprvalue>true</rtexprvalue> 
        </attribute>
		<attribute>
             <name>privatekey</name>
             <required>true</required>
			 <rtexprvalue>true</rtexprvalue> 
        </attribute>
		<attribute>
             <name>themeName</name>
             <required>false</required>
			 <rtexprvalue>true</rtexprvalue> 
        </attribute>
    </tag>
 
</taglib>

With all this in place, update the JSP page with the following code to display the CAPTCHA Widget:


<%@ taglib uri="http://java.sun.com/jsp/jstl/core" prefix="c" %>
<%@ taglib uri="http://www.springframework.org/tags/form" prefix="form" %>
<%@ taglib prefix="captcha" uri="/WEB-INF/tlds/captcha.tld" %>
<%@ taglib prefix="spring" uri="http://www.springframework.org/tags" %>

<html>
<head>
	<title>Home</title>
</head>
<body>

<form method="post">

	<captcha:captcha themeName="clean" publickey="YOUR_PUBLIC_KEY" privatekey="YOUR_PRIVATE_KEY"/>
	
</form>


</body>
</html>

Upon running the code, you should see a CAPTCHA similar to the image below:

Captcha In Action

Validate CAPTCHA Reponse

In order to valdiate the CAPTCHA response, we need to modify the POST method of the receiving controller as shown below:

@RequestMapping(method = RequestMethod.POST)
	public String processSubmit(HttpServletRequest request, Model model)
	{
		ReCaptchaImpl reCaptcha = new ReCaptchaImpl();
        reCaptcha.setPrivateKey("YOUR_PRIVATE_KEY");
        
		String remoteAddr = request.getRemoteAddr();
        String challengeField = request.getParameter("recaptcha_challenge_field");
        String responseField = request.getParameter("recaptcha_response_field");
        ReCaptchaResponse reCaptchaResponse = reCaptcha.checkAnswer(remoteAddr, challengeField, responseField);

        if(!reCaptchaResponse.isValid())
        {
        	model.addAttribute("invalidCaptcha", "Captcha Is Invalid");
        	return "home";
        }
        
        return "success";
	}

In the above code, we start by creating a ReCaptchaImpl instance and pass in the Private key. The reCaptcha widget generates two fields “recaptcha_challenge_field”, “recaptcha_response_field” that are needed to verify the response. We pass in those two fields along with the IP Address of the client to get a response.

For invalid responses, we set a model attribute to indicate the error. Now, in a Spring MVC application where you are using a command object for the form, you can add an error instance instead:

		if(!reCaptchaResponse.isValid())
        {
        	errors.reject("captcha.invalid");
        }

Spring MVC 3.1.1 Archetype

May 18th, 2012 No comments

I have created a new Maven archetype for creating Spring MVC 3.1.1 based web applications.

To install the archetype, download the file and simply run the following command:

mvn install:install-file -DgroupId=com.inflinx.blog -DartifactId=spring-mvc-web-archetype -Dversion=1.0.0 -Dpackaging=jar -Dfile=spring-mvc-web-archetype-1.0.0.jar

The above command needs to be run from the directory where you have placed the downloaded file.

To use the installed archetype run the following command from your project folder:

mvn archetype:generate -DarchetypeGroupId=com.inflinx.blog -DarchetypeArtifactId=spring-mvc-web-archetype -DarchetypeVersion=1.0.0 -DgroupId=com.inflinx.blog -DartifactId=YOUR_PROJECT_NAME -DartifactVersion=1.0.0 -DinteractiveMode=false

If you are interested in creating your own archetypes refer to my Creating Maven Archetypes – Spring MVC Example blog post.

Categories: Maven, Spring Tags: ,

Creating Maven Archetypes – Spring MVC Example

April 16th, 2010 7 comments

Maven Archetypes are project templates that allow users easily create new projects. Maven Archetypes are great way to share best practices and enforce consistency beyond Maven’s standard directory structure. For example, an organization can provide its developers an archetype bundled with company’s approved CSS and JavaScript libraries.

Recently, I have been creating a lot of Spring MVC based projects and each time I do, I copy a lot of information (configuration files, css files, dependency information etc) from an existing project. Following the DRY principles, I decided to create several Spring MVC based archetypes that can help me bootstrap my projects quickly. In this post I will share my experiences creating and using a new Maven Archetype.

Maven provides several ways to create a new archetype as described here. Since I have an existing Spring MVC project, I will be using the archetype:create-from-project goal.


Creating Archetype

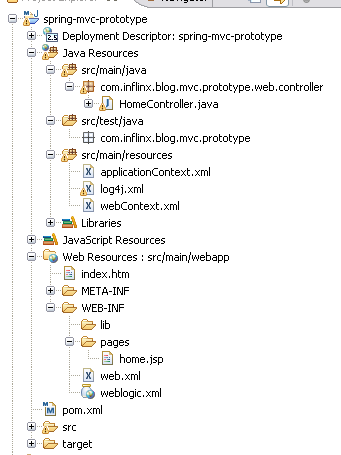
Step 1: Identify the Maven Project that would be used as prototype for the archetype. Make sure it has only the resources (configuration, properties and Java files) that you would like to be part of the archetype. It is recommended to remove IDE specific files (.project, .classpath etc) from the project directory. Here is the spring-mvc-prototype project that I will be using:

Prototype Project Layout

Prototype Project Layout

Step 2: Using command line, navigate to the project folder spring-mvc-prototype and run the following command:

	mvn archetype:create-from-project
	

Upon completion of the command, you should see the message “Archetype created in target/generated-sources/archetype”. The newly created archetype is now under spring-mvc-prototype/target/generated-sources/archetype

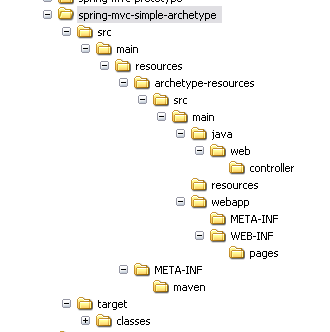
Step 3: The next step is to move the newly created archetype into a separate folder so that it can be tweaked and published. I have moved the content inside the spring-mvc-simple-archetype folder.

Archetype Directory Structure

Archetype Directory Structure

Step 4: Modify the artifactId in the archetype’s pom.xml located at the root of spring-mvc-simple-archetype folder.

Existing pom.xml:

  com.inflinx.blog
  spring-mvc-prototype-archetype
  1.0.0-SNAPSHOT
  maven-archetype
  spring-mvc-prototype-archetype

Modified pom.xml:

	com.inflinx.blog
	spring-mvc-simple-archetype
	1.0.0-SNAPSHOT
	maven-archetype
	spring-mvc-simple-archetype	

Step 5: Modify the finalName in the resource’s pom.xml file located at spring-mvc-simple-archetypesrcmainresourcesarchetype-resources.

		 
		spring-mvc-prototype

		
		${artifactId}
	

During project creation, maven will replace the ${artifactId} expression with the user supplied artifactId value.

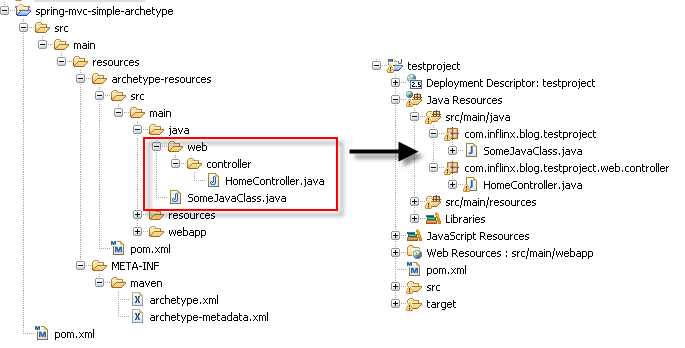
Step 6: When creating a project from an archetype, Maven prompts the user for a package name. Maven will create the package in the source folder (srcmainjava) of the project being created and will move the contents under archetype-resourcessrcmainjava into the package.

Maven File Copy

Maven File Copy

While generating the “testproject” above, the user specified the package “com.inflinx.blog.testproject”. So the SomeJavaClass.java file got moved to the root of the package and the HomeController.java got moved under the web.controller subpackage.

Step 7: The next step is to verify that the generated archetype.xml (located under src/main/resources/META-INF/maven) has all the files listed and they are located in the right directories. For example, the HomeController is located under archetype-resources/src/main/java/web/controller/HomeController.java. So there should be an entry under sources in the archetype.xml that looks something like this:

	  
	    src/main/java/com/inflinx/blog/mvcprototype/web/controller/HomeController.java
	  

Step 8: Modify the configuration files to correctly use the ${package} variable. For example, the webContext.xml file is modified so that the controllers located under web.controller sub package are picked up:


Step 9: The final step in creating the archetype is to run the following on command line inside the folder spring-mvc-simple-archetype:

	mvn clean install


Using the archetype

Once the archetype is installed, there are several ways to create a project from it.

Generate goal: Create an empty folder and run the following command:

 		
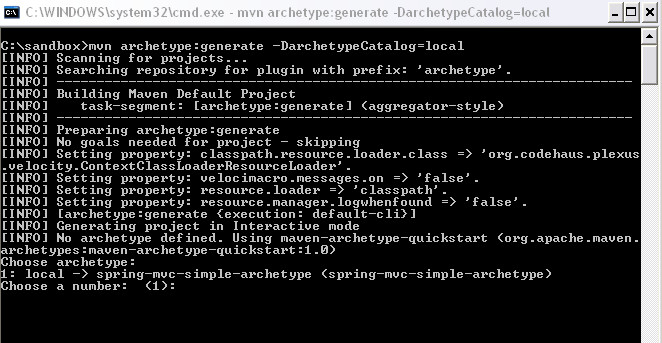
 		mvn archetype:generate -DarchetypeCatalog=local
		

This goal would scan the local catalog for archetypes and prompts the user to select an archetype to use.

Command Line Archetype Usage

Command Line Archetype Usage

Once the user enters 1, Maven selects the spring-mvc-simple-archteype for project creation.

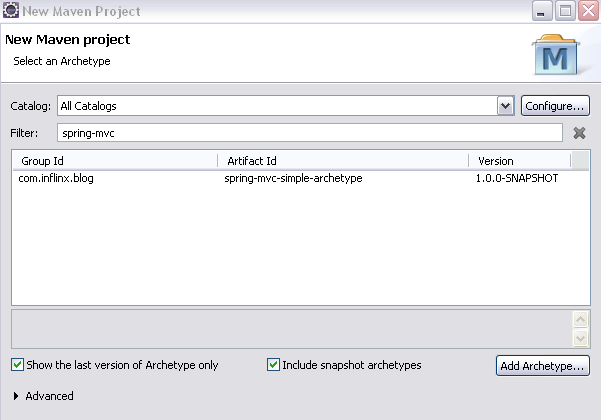
m2Eclipse Plugin: If you are an Eclipse user, use the New Project Wizard and search and select the spring-mvc-simple-archetype.

m2Eclipse Archetype Usage

m2Eclipse Archetype Usage

Using m2Eclipse plugin is a real time saver since it creates the associated IDE specific configuration files.


Adding Custom Properties

On some projects, additional information such as user name or web application context might be needed to generate the project. Here are the steps to prompt the user for information and use it:

Step 1: Add to the archetype-metadata.xml file located under spring-mvc-simple-archetypesrcmainresourcesMETA-INFmaven a required properties entry:


Step 2: Modify the file where you would like to use the information. Below, I have modified weblogic.xml to have the context root value the user has provided:


	        true
	    
		${contextRoot}	
	

When the user uses the archetype with the above modifications, he will be prompted for the contextRoot.

Custom Attribute Usage In Action

Custom Attribute Usage In Action