Archive

Archive for the ‘Solutions Log’ Category

Redirecting from WordPress.com

October 14th, 2009 1 comment

The blog post WordPress.com to WordPress.org is an excellent reference if you are planning on redirecting your existing WordPress.com blog to a blog on a domain you own. However, it does not talk about redirecting a WordPress.com blog to a blog on a sub-domain. In this post, I want to share the steps I followed to redirect my http://onerandomthought.wordpress.com blog to http://blog.inflinx.com hosted on Go Daddy. I am assuming that you have already moved all your posts from your WordPress.com blog to your new blog and verified that Permalinks on both blogs match.


Step 1: Log into http://wordpress.com and go to the Domains in the Dashboard. Under “Add a Domain” enter your subdomain.domain.com and hit “Add domain to blog”:
 Add a Domain


WordPress would come back complaining that there is a possible problem with the domain, It recommends that we add a CNAME entry pointing to WordPress.com blog in registrar before proceeding:
Problem Adding Domain


Step 2: Log into your godaddy.com account and launch Domain Manager. Select the domain name in the list of domains:
Go Daddy Select Domain


On the resulting page, click on the “Total DNS Control”:
Total DNS Selection


Inside the “Total DNS Control”, before I could add a CNAME entry for “blog”, I had to delete the existing “blog” record under A (HOST). The delete option is listed under “Actions”. Make sure you save the IP address that blog is pointing to:
 Delete Sub Domain


The next step is to create a new CNAME entry. Click on the Add New CNAME Record and fill the resulting form. Then, hit Ok and it would create a new CNAME record:
Add CNAME Record


Step 3: Repeat Step 1 and now wordpress.com should allow you to register the domain:
Wordpress - Add a sub domain


Follow the next steps and purchase the credits to register the domain:
Purchase Domain Mapping


Once the purchase, is complete, All the traffic for blog.inflinx.com should now be redirected to onerandomthought.wordpress.com.
After Domain Mapping Purchase
You might need to clear the DNS Cache to verify the redirect. On Max OSX, this is done through the command: dscacheutil -flushcache


Step 4: Now that we have this going, we just need to reverse the redirection behavior. In the WordPress.com, select the radio button next to your sub domain and hit “Update Primary Domain”. Then, go back to the “Total DNS Control” and undo what was done in Step 2. This involves first deleting the CNAME entry and adding the blog entry under A(Host). Make sure you are using the same IP address you saved in step 2.


Once Step 4 is completed, all the WordPress.com blog traffic should now be sent over to the blog on your sub domain.

Categories: Solutions Log, Wordpress Tags:

Adding JQuery Slider Part II

October 9th, 2009 No comments

In my last post I showed how to easily add slider functionality using JQuery. In this post I will showcase some of the options that slider provides with a Temperature Converter. This is how it will work: the slider represents temperature measured in Celsius units and ranges between 0 and 100. As the user drags the slider, we will display the temperature equivalent in Fahrenheit.

Lets start by registering a basic slider:

   <script type="text/javascript">
	$(function()
	{
		$("#slider").slider();
	});
   </script>

Since the slider converts temperatures in the range 0 celsius and 100 celsius, modify the slider definition to include the range:

	$("#slider").slider({
		min: 0,
		max: 100,
		step: 1
		
	});

The next step is to add two span tags to display the chosen temperature and the temperature in Fahrenheit:

	Temperature in Celsius: <span id="celsius">0</span>
	
Temperature in Fahrenheit: <span id="fahrenheit"></span>

Finally all we need to do would be to captrue the slide event so that we can update the span tags:

	$("#slider").slider({
		min: 0,
		max: 100,
		step: 1,
		slide: handleSlide
	});

The handleSlide is a javascript function that looks like this:

	function handleSlide(event, ui)
	{
		// Update the celsius span
		$("#celsius").html(ui.value);

		// Compute the fahrenheit equivalent
		var fTemp = (1.8 * ui.value) + 32;

		// Just display the last two digits of the temp
		$("#fahrenheit").html(fTemp.toFixed(2));
	}	

Here is a working demo

Categories: JQuery, Solutions Log Tags:

Adding JQuery UI Slider

October 1st, 2009 No comments

Here are five easy steps to add slider functionality to your web applications:

Step 1: Go to JQuery UI site and create a custom download. To keep things simple, select “No Theme”.under theme section and deselect all but UI Core and Slider checkboxes. Hit Download and unzip the downloaded file.

Step 2: Copy the jquery-1.3.2.min.js and “jquery-ui-1.7.2.custom.min.js” files into your project. These files should be under the js folder. Include the js files in your html/jsp page.


Step 3: Add the following styles to the page:


I am using the slider bar and slider handle images from YUI

Step 4: Add a DIV for the slider in the HTML.


Step 5: Initialize the slider in the document ready function:


That’s it. You can find a demo of this example here.

Mousefeed Eclipse Plugin

July 30th, 2009 1 comment

Today, I ran into a really cool eclipse plugin called Mousefeed. Once installed, this plugin will popup a reminder with shortcut information every time a button or a menu item is clicked using mouse.

I find this a great way to quickly learn Eclipse shortcuts and becoming productive with the IDE.

Categories: Solutions Log Tags:

Changing Maven4MyEclipse Web Project Directory Structure

September 11th, 2008 No comments

When you create a MyEclipse Web Project with Maven capabilities, the generated directory structure does not match the “standard” Maven Web Project structure. I find this little annoying and here is what I did to change the directory structure:

  • Under “src” folder, create two folders main and test. Underneath each folder create two folders java and resources
  • Go to project properties and under Java Build Path, first remove “src” folder from being a source folder. Make java and resources folders source folders
  • Create webapp folder underneath src/main. Create WEB-INF and classes folders under webapp. Move the web.xml under WebRoot/WEB-INF to webapp/WEB-INF folder
  • In the .mymetadata file located in the project root folder (use Navigator view to get to the file in MyEclipse), change the attribute webrootdir’s value to /src/main/webapp
  • In the .classpath file, change the classpathentry of kind “output” from “WebRoot/WEB-INF/classes” to “src/main/webapp/WEB-INF/classes”
  • Delete the WebRoot directory and restart MyEclipse

The original pom.xml generated as part of the Maven4MyEclipse Web Project has several entries (sourcedirectory, resource directory e.t.c.) to reflect MyEclipse Web project directory structure. These entries can be safely deleted. Once this is done, the new project can be used to hot-deploy the war file. And yes, dependencies declared as “test” will not end up in the lib directory of the hot-deployed war file.

Running database tests faster using TestNG

September 1st, 2008 No comments

In a recent project, I was doing some integration testing against database using DBUnit and JUnit. I was dealing with large datasets and as the tests grew, testing became painfully slow. Culprit: I had JUnit update the database with data for every test.

The data access layer for this project had lots of complex queries but the methods I was testing had two distinct behaviors: methods that read data from the database and methods that wrote data to the database. This simple observation made me realize that I can cut down the testing time by 
  – Grouping tests in to “read” and “write” groups
  – Refreshing database and run ALL the tests in the “read” group (even better run them parallely)
  – Refreshing database before running each and every test in the “write” group

Since JUnit does not provide a way to implement the above idea, I tried TestNG. Here is a simple java code of what I ended up doing:


public class RepositoryImplTest {
  
  private void setupDataBase() {
    // DBUnit code to refresh data
  }
  
  @BeforeClass(groups={"database.read"}, alwaysRun=false)
  public void setupForRead() {
    setupDataBase();
  }
  
  @BeforeMethod(groups={"database.write"}, alwaysRun=false)
  public void setupForWrite() {
    setupDataBase();
  }
  
  @Test(groups="database.read")
  public void findAllXXX() {
    
  }
  
  @Test(groups="database.read")
  public void findByXXX() {
    
  }
  
  @Test(groups="database.write")
  public void updateXXX() {
    
  }
  
  @Test(groups="database.write")
  public void removeXXX() {
    
  }  
  
  @Test(groups="database.write")
  public void createXXX() {
    
  }
}

Here is the sample testng.xml file for the above code:

Categories: Solutions Log Tags:

WebLogic anonymous user permissioning

August 26th, 2008 No comments

Problem: Accessing MBeans in WebLogic versions 8.1 SP5 and after results in
javax.naming.NoPermissionException: User <anonymous> does not have permission on weblogic.management.home to perform lookup operation.

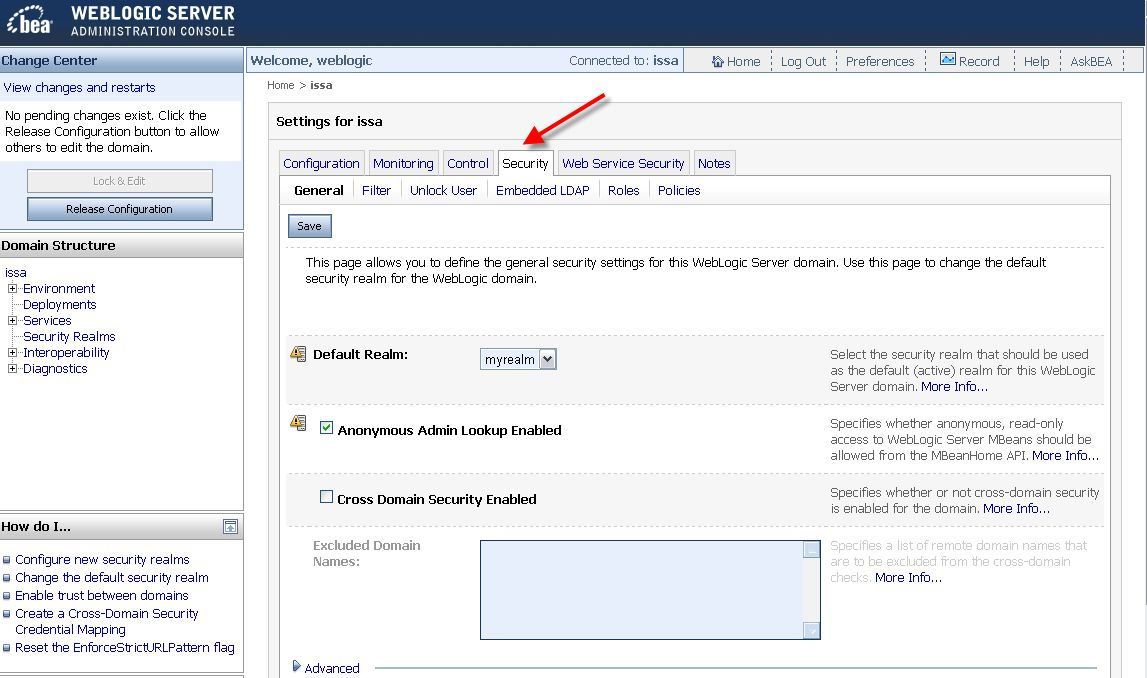
Solution:  A quick fix to this problem is to enable anonymous admin lookup in WebLogic server. In WebLogic 10, this option is available under Security tab of the domain.

Categories: Solutions Log Tags: