Archive

Posts Tagged ‘WebLogic’

JAX-WS Using WebLogic 10.3

October 9th, 2010 1 comment

The Java API for XML Web Services or JAX-WS provides a simple, easy to understand architecture for developing and deploying web services. In this post I will be creating a simple Task List CRUD application that showcases the JAX WS technology. I will be using Eclipse IDE for development and WebLogic 10.3.0 for deployment. Weblogic 10.3.0 supports Java EE 5 specification and implements JSR109. Therefore it does not require any additional jars or configuration such as jax-ws.xml file for running web services.

Here are the requirements for the Task List application:

  • The application should allow new tasks to be created
  • Tasks can be updated, queried and deleted
  • Tasks can be associated with a one or more tags

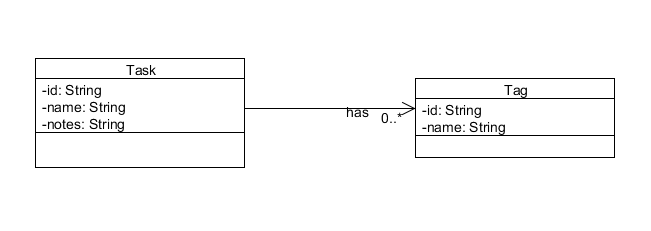
To keep this blog post manageable, I will not be storing the tasks in to a persistent store such as a database. I am also not going to worry about concerns such as authentication and security. We will start the implementation with the domain model which consists of Task and Tag objects. The figure below gives the UML representation of the domain model.

One To Many Relationship B/N Task and Tag

And here is the associated Java code for the two classes:

	package com.inflinx.blog.taskservice.domain;
	
	import java.util.ArrayList;
	import java.util.List;
	
	public class Task {
		
		private String id;
		private String name;
		private String notes;
		private List<Tag> tags = new ArrayList<Tag>();
	
		public String getId() {
			return id;
		}
		public void setId(String id) {
			this.id = id;
		}
		public String getName() {
			return name;
		}
		public void setName(String name) {
			this.name = name;
		}
		public String getNotes() {
			return notes;
		}
		public void setNotes(String notes) {
			this.notes = notes;
		}
		public List<Tag> getTags() {
			return tags;
		}
		public void setTags(List<Tag> tags) {
			this.tags = tags;
		}
	}
	package com.inflinx.blog.taskservice.domain;
	
	public class Tag {
		private String id;
		private String name;
	
		public String getId() {
			return id;
		}
		public void setId(String id) {
			this.id = id;
		}
		public String getName() {
			return name;
		}
		public void setName(String name) {
			this.name = name;
		}
	}

The next step is to create a Web Service class that would service the client’s requests for creating new tasks or updating, removing and querying existing tasks. Here I am taking a Java to WSDL approach where we start with the Java code and let the tools generate WSDL and related schemas at runtime. Web Service classes in JAX WS are simple pojos and use annotations for providing meta data to the container. Here is the starting point of our web service class:

	package com.inflinx.blog.taskservice.service;
	
	import javax.jws.WebService;
	
	@WebService(serviceName="service", targetNamespace="ns.blog.inflinx.com")
	public class TaskManager {
		
		
	}

The @WebService annotation, part of the javax.jws package, indicates that we are building a JAX WS based web service. The targetNamespace attribute assigns a name space to the service defined. If the targetNameSpace is not used, then the reverse package name will be used. The serviceName defines the URL of the deployed service. In this case, the URL to access the service would be: http://locahost:7001/taskservice/service?wsdl The associated XSD can be found at: http://localhost:7001/taskservice/service?xsd=1. If we would like to expose the service under a different URL, say http://localhost:7001/taskservice/api/service we just need to change the serviceName to “api/service”.

Since we will not be using a database to persist tasks, I have added two Maps to hold submitted task and tag data. These maps are initialized with dummy data in the web service constructor as shown in the code below.


	public class TaskManager {
		
		private static Map<String, Task> TASK_DATA = new HashMap<String, Task>();
		private static Map<String, Tag> TAG_DATA = new HashMap<String, Tag>();
		
		public TaskManager() {
			
			TAG_DATA.put("1", new Tag("1", "Web Service"));
			TAG_DATA.put("2", new Tag("2", "Flex"));
			TAG_DATA.put("3", new Tag("3", "Spring"));
			
			Task task = new Task("1", "Write Blog on JAX WS", "This will be part 1");
			List<Tag> tagList = new ArrayList<Tag>();
			tagList.add(TAG_DATA.get("1"));
			task.setTags(tagList);
			TASK_DATA.put("1", task);
			
			Task task2 = new Task("2", "Write Blog on Flex", "This will be a future post");
			List<Tag> tagList2 = new ArrayList<Tag>();
			tagList2.add(TAG_DATA.get("2"));
			task2.setTags(tagList2);
			TASK_DATA.put("2", task2);
		}
	}	

The next step is to add operations to the web service. Here is a simple delete operation with JAX WS annotations.

@WebMethod
public void delete(@WebParam(name="taskId") String taskId) {
	TASK_DATA.remove(taskId);		
}

The @WebMethod annotation is used to indicate a web service operation. The @WebParam is used to provide additional information about the parameters for the generated service. If a name is not specified, then the parameters in the Schema will be named as arg0, arg1 etc. Currently JAX WS does not provide a way to mark a parameter as required. It is not required to annotate web service operations with @WebMethod annotation. However, if you choose to annotate one, then you should annotate all the operations that needs to be exposed as part of the service.

Before we move further, we need to indicate how Java Task objects should be marshalled to XML. In order to do this, we will be using the Java Architecture for XML Binding or JAXB. JAXB provides a convenient model for marshalling Java objects into XML and unmarshalling XML back into Java Objects. The JAXB API constitutes a set of annotations that
enable mapping between Java classes and their XML representations. The table below lists the commonly used JAXB annotations along with their descriptions:

XmlRootElement This annotation indicates a class to be used as a root element in the generated XML document. If the name attribute is not specified then JAXB would automatically use the class name with first letter lowercased as the root element name.
XmlType This annotation can be used to provide additional information for generating the XML schema. For example the propOrder attribute can be used to indicate the order of the child elements in the marshalled document
XmlAccessorType This annotation can be used to control the data that gets serialized. For example, XmlAccessType.FIELD indicates that all non static, non transient fields of a class to be marshalled.
XmlElement This annotation is used to map a JavaBean property to an XML element.
XmlAttribute This annotation is used to map a JavaBean property to an XML attribute.
XmlElementWrapper This annotation can be used to create a wrapper around generated XML for a particular element.

Here are the modified Task and Tag Java classes that uses the above JAXB annotations.

	package com.inflinx.blog.taskservice.domain;
	
	import java.util.ArrayList;
	import java.util.List;
	
	import javax.xml.bind.annotation.XmlAccessType;
	import javax.xml.bind.annotation.XmlAccessorType;
	import javax.xml.bind.annotation.XmlElement;
	import javax.xml.bind.annotation.XmlElementWrapper;
	import javax.xml.bind.annotation.XmlRootElement;
	import javax.xml.bind.annotation.XmlType;

	@XmlAccessorType(XmlAccessType.FIELD)
	@XmlType(name="", propOrder={"id", "name", "notes", "tags"})
	@XmlRootElement(name = "task")
	public class Task {
		
		@XmlElement(required=true)
		private String id;
		
		@XmlElement(required=true)
		private String name;
		
		@XmlElement(required=false)
		private String notes;
		
		@XmlElementWrapper(name="tags", required=false)
		@XmlElement(required=false, name="tag")
		private List<Tag> tags = new ArrayList<Tag>();
		
		// Getters and Setters
		
	}
	package com.inflinx.blog.taskservice.domain;
	
	import javax.xml.bind.annotation.XmlAccessType;
	import javax.xml.bind.annotation.XmlAccessorType;
	import javax.xml.bind.annotation.XmlElement;
	import javax.xml.bind.annotation.XmlRootElement;
	import javax.xml.bind.annotation.XmlType;
	
	@XmlAccessorType(XmlAccessType.FIELD)
	@XmlType(name="", propOrder={"id", "name"})
	@XmlRootElement(name = "tag")
	public class Tag {
		
		@XmlElement(required=true)	
		private String id;
		
		@XmlElement(required=true)
		private String name;
		
		// Getters and setters
	}
	

Finally, here is the rest of the web service implementation.

		@WebMethod	
		public Task findTask(@WebParam(name="taskId") String id) {
					return TASK_DATA.get(id);
		}
		
		@WebMethod
		public @WebResult(name="task") Task[] findAll() {
				return TASK_DATA.values().toArray(new Task[0]);
		}	
		
		@WebMethod
		public void create(@WebParam(name="task") Task task) {
			TASK_DATA.put(task.getId(), task);
		}
			
		@WebMethod
		public void update(@WebParam(name="task") Task task) {
			TASK_DATA.put(task.getId(), task);
		}
			
		@WebMethod
		public void delete(@WebParam(name="taskId") String taskId) {
			TASK_DATA.remove(taskId);
		}

That is all it takes to create a JAX WS web service. Once the web service is deployed to the WebLogic server, you can test it using tools like SoapUI.
Categories: JAX WS, JAXB Tags: ,

EJB 3 Message Driven Beans in WebLogic 10.3

March 21st, 2010 2 comments

In this post, I will show how to create and test Message Driven Beans in WebLogic 10.3. Here are the steps:

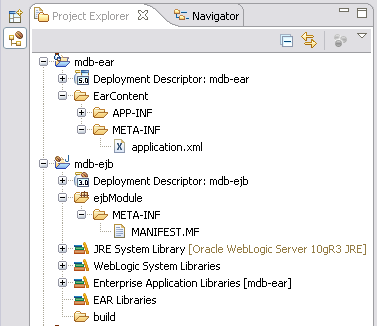
Step 1: The first step is to create projects to hold Message Driven Beans. Using Eclipse IDE, here are the generated EAR and EJB projects:

MDB Project Layout

MDB Project Layout

EAR is the standard packaging mechanism for Java enterprise applications.

Step 2: The next step is to create the Message Driven Bean. The MDB created in this post will be consuming messages from a Distributed Queue with the JNDI name jndi.blogQueue. Refer to the “Distributed JMS Queue on WebLogic 10” post for details on creating Distributed Queues in WebLogic.

	package com.inflinx.blog.springmdb;

	import javax.ejb.ActivationConfigProperty;
	import javax.ejb.MessageDriven;
	import javax.jms.Message;
	import javax.jms.MessageListener;

	@MessageDriven(
			mappedName = "jndi.blogQueue",
			activationConfig = { @ActivationConfigProperty(
					propertyName = "destinationType", propertyValue = "javax.jms.Queue"
				)}
			)

	public class TestMdb implements MessageListener 
	{
	    public void onMessage(Message message) 
	    {
		System.out.println("Received Message: " + message);
	    }
	}

Step 3: The next step is to package the newly created MDB into an EJB which then gets packaged into a ear file for deployment. During development in Eclipse, simply right click on the mdb-ear and click Run -> Run On Server. This IDE deployment assumes that the Oracle Server Adapter is installed in Eclipse and configured to talk to a WebLogic 10.3 server instance.

Step 4: To make sure that the MDB is deployed properly, let us create a MessageGenerator class that adds a message to the queue:


	public class MessageGenerator 
	{
		public static void main(String[] args) throws Exception
		{
			Context context = getInitialContext();
			
			ConnectionFactory connectionFactory = (ConnectionFactory)context.lookup("jndi.blogfactory");
			Queue queue = (Queue) context.lookup("jndi.blogQueue");
			Connection connection = connectionFactory.createConnection();
			Session session = connection.createSession(false, Session.AUTO_ACKNOWLEDGE);
			
			MessageProducer producer = session.createProducer(queue);
	
			TextMessage message = session.createTextMessage();
			message.setText("Hello World");
			producer.send(message);
			
			connection.close();
		}
		
		private static Context getInitialContext() throws Exception
		{
			Hashtable env = new Hashtable();
			env.put(Context.INITIAL_CONTEXT_FACTORY, "weblogic.jndi.WLInitialContextFactory");
			// TODO: Change the server and port name to suit your environment before running the class
			env.put(Context.PROVIDER_URL, "t3://localhost:9001");
			return new InitialContext(env);
		}
	}

Running the above class will add a new TextMessage to the Queue. Once a new message is available, the TestMDB’s onMessage() method gets invoked and you should see the message “Received Message: TextMessage[ID:, null]” in the WebLogic console logs.

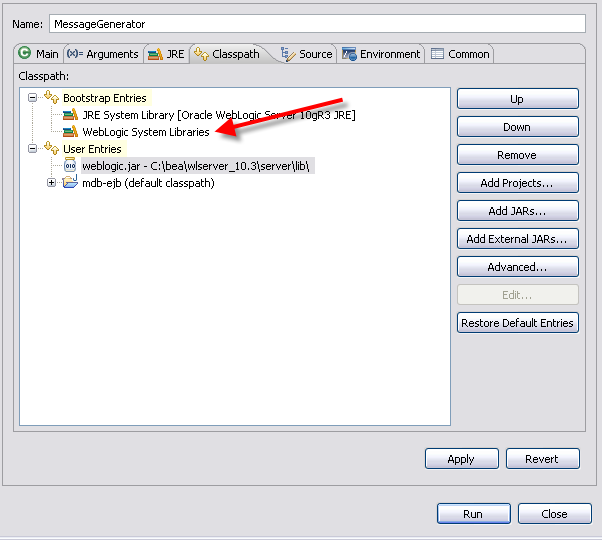
For the above class to run from Eclipse, make sure that you remove “WebLogic System Libraries” and add weblogic.jar to the MessageGenerator “Run Configurations…”.

Message Generator Run Configuration

Message Generator Run Configuration

Otherwise you will end up getting the error:

Exception in thread “main” java.lang.NoClassDefFoundError: weblogic/kernel/KernelStatus
at weblogic.jndi.Environment.(Environment.java:78)
at weblogic.jndi.WLInitialContextFactory.getInitialContext(WLInitialContextFactory.java:117)
at javax.naming.spi.NamingManager.getInitialContext(NamingManager.java:667)
at javax.naming.InitialContext.getDefaultInitCtx(InitialContext.java:288)
at javax.naming.InitialContext.init(InitialContext.java:223)
at javax.naming.InitialContext.(InitialContext.java:197)
at com.inflinx.blog.test.MessageGenerator.getInitialContext(MessageGenerator.java:40)
at com.inflinx.blog.test.MessageGenerator.main(MessageGenerator.java:18)


Download the source code for this post here.

Optional Packages in Weblogic 10.3

March 18th, 2010 3 comments

Optional Packages provide a great way to share individual jar files among multiple applications. Reusable java classes and third party framework classes are good candidates for deploying as optional packages. In this post I will show how to install and use Optional Packages in Weblogic 10.3.

I. Create Jar file
The first step in the process is to bundle a reusable Java class as a Jar file. To keep things simple, I will create a simple String Utility class.

 	
	public class StringUtil
	{
		public static boolean isEmpty(String text)
		{
			return null == text || "".equals(text);
		}
		
	}

The next step is to create a MANIFEST.MF file with the following information:

Manifest-Version: 1.0
Extension-Name: StringLib
Specification-Version: 1.0.0.0
Implementation-Version: 1.0.0.0

As you can see, the MANIFEST.MF file holds the information about the library such as name and version. The next step is to package the application into a jar file.


II. Install Optional Packages
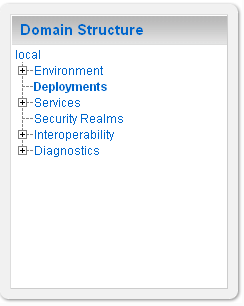
Launch WebLogic console and click on Deployments:

Domain Structure

Domain Structure

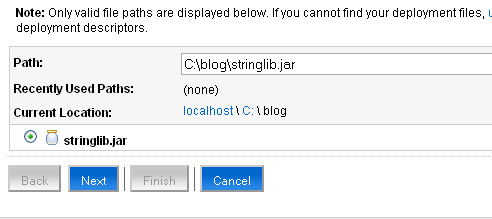
Click on Install and on the next screen, browse to the folder containing the jar and select the jar:

Select Jar

Select Jar

Select the defaults on the next page and hit Finish. Restart the server for the changes to take effect.


III. Using Optional Packages in Web Application
Open the application’s MANIFEST.MF under META-INF folder and add the following entries:

Manifest-Version: 1.0
Extension-List: strlib
strlib-Extension-Name: StringLib
strlib-Specification-Version: 1.0.0.0
strlib-Implementation-Version: 1.0.0.0

Modify application’s code to start using the StringLib library. Even though Optional Packages are not deployed along with the application, you still might need them in your application’s class path during development. Maven users can do this by changing the jar dependency to provided in their pom.xml file.


Download stringlib.jar and demo war file along with source code here.

Categories: Solutions Log Tags:

weblogic.xml deployment descriptor

December 31st, 2009 1 comment

If you are using 10.3.0 version of Weblogic here is a sample weblogic.xml file with correct schema information:


	YOUR_APPLICATION_CONTEXT_NAME


And here is a sample weblogic.xml file for version 10.3.2 version:


     	YOUR_APPLICATION_CONTEXT_NAME


If you use the wrong version file, you might end up with exceptions like this:

com.bea.xml.XmlException: failed to load java type corresponding to e=weblogic-web-app@http://xmlns.oracle.com/weblogic/weblogic-web-app
at com.bea.staxb.runtime.internal.UnmarshalResult.getPojoBindingType(UnmarshalResult.java:361)
at com.bea.staxb.runtime.internal.UnmarshalResult.determineTypeForGlobalElement(UnmarshalResult.java:316)
at com.bea.staxb.runtime.internal.UnmarshalResult.determineTypeForGlobalElement(UnmarshalResult.java:326)
at com.bea.staxb.runtime.internal.UnmarshalResult.determineRootType(UnmarshalResult.java:307)
at com.bea.staxb.runtime.internal.UnmarshalResult.unmarshalDocument(UnmarshalResult.java:158)
Truncated. see log file for complete stacktrace

Categories: Solutions Log Tags:

Distributed JMS Queue on WebLogic 10

June 5th, 2008 11 comments

Several months ago, I had to setup a JMS queue on a WebLogic 10 server.  Bea has nice documentation for JMS at http://edocs.bea.com/wls/docs100/messaging.html. Here is a condensed version for setting up JMS Distributed Queues.

Disclaimer: These are instructions for the minimal JMS setup and do not include optimizations/tuning for production environment. 

The first step in setting up a Distributed Queue is to create a JMS server for managing the Queue. Here are the steps for creating a JMS server.

  1. Under Domain Structure, go to Services -> Messaging -> JMS Servers and hit New
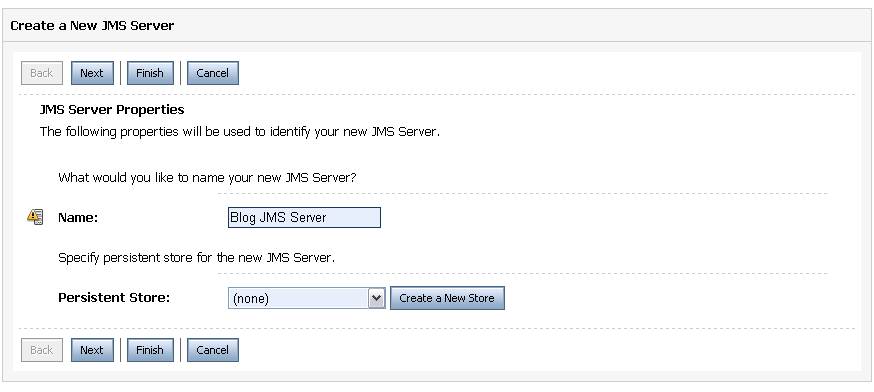
  2. Enter a name for the JMS server (e.g., “Blog JMS Server”)  JMS Server Info


  3. Hit “Create a new Store” (if you are not planning to persist messages, you don’t need a store).  File Store Info


  4. Select “File Store” as the type, and in the subsequent screen, provide a name and directory location for the store. Hit Finish
  5. Hit “Next” and select the target WebLogic server. Hit “Finish” to complete the JMS server creation. Make sure you “Activate” the changes.

The next step is to create a JMS Module. A JMS Module is a way for packaging JMS resources such as Queues and topics. Here are the steps to create a JMS module:

  1. Under Messaging, select JMS Module and hit “New”.
  2. Enter a name (e.g., Blog JMS System Module) and the rest of the fields on the page can be left empty.  File Store Info
  3. Hit “Next”, and select the WebLogic server you would like to target (ideally, this would be the same server that is hosting the JMS server you created above).
  4. On the next screen hit Finish and “Activate” changes.

Now that the entire infrastructure is in place, it’s time to create a Distributed Queue. WebLogic’s new “Distributed Queue” eliminates the need to create physical queues and mapping them to a Distributed Queue (a great improvement from WL 8.x). Here are the steps:

  1. Select the JMS Module you just created and hit “New” on the next page.
  2. Select Distributed Queue option and continue on to the next page.
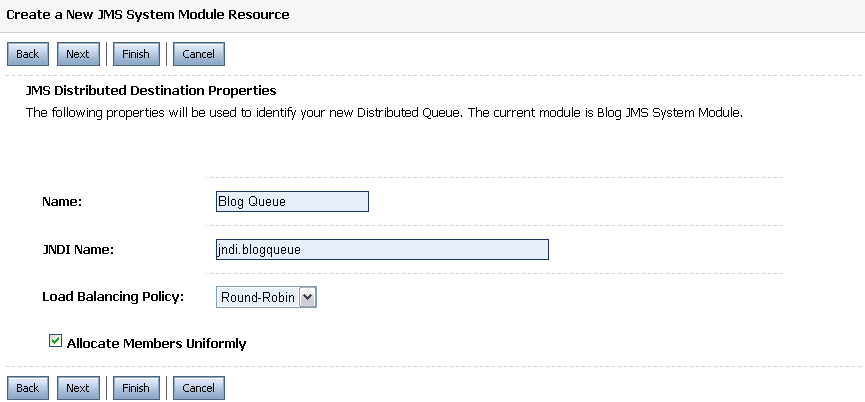
  3. Provide a name (e.g., Blog JMS Queue) and a JNDI name (e.g., jndi.blogQueue).  Queue Info
  4. On the next page, select “Advance Targeting” and hit “Create a New Subdeployment”. A Subdeployment is a convenient way for grouping and targeting JMS module resources.
  5. Provide a name (e.g., Blog Subdeployment) for the Subdeployment and hit “Ok”. SubDeployment Info
  6. Select the JMS server you created above as the target and hit “Finish”.

For clients to connect and use JMS resources, a JMS Connection Factory is needed. Here are the steps for creating a Connection factory:

  1. Select the JMS Module created above and hit “New” on the next page.
  2. Select “Connection Factory on the next screen and move on to the next page.
  3. Give the Connection factory a name (e.g., Blog Connection Factory) and JNDI name (e.g., jndi.blogfactory). Hit “Next”. Factory Info
  4. Select “Advance Targeting” and on the next page, select the Subdeployment you created above (Blog Subdeployment). Wait for the page to refresh itself and hit Finish
Categories: Configuration Tags: ,